Peach Jam

How can we let Summer pass us by without celebrating one of it's many gifts: peaches? Seems like an opportunity that just can't be missed if you ask me. Now, there are many different directions that we could go in with our little round friends that are only in season for a hot (really hot, like 90-degree-weather kind of hot) second. Ice cream, shortcake, scone, sangria. But I decided to do what my heart was telling me to do; make jam. And what baby wants, baby gets. My heart is the baby in this scenario...Or maybe it's my stomach?

Let's move on.

Some people prefer to make their jam with granulated sugar, but I tend to prefer light brown. To me, it brings a warmth and more nuanced flavor than just white sugar. It helps to sweeten whatever berry or stone fruit that you've decided to make into a jam, while also giving more of a depth of flavor. This go-round, I also decided to add a little splash of vanilla. But, you should only do this if you're truly a die-hard vanilla fan as it is a flavor that refuses to stay subtle. I happen to love it, but the choice is yours and yours alone.

Of course, one very vital ingredient when making jam, whatever kind you choose, must be lemon. Not lemon extract, but fresh lemon juice, plus the zest. What lemon does is not only brighten the other flavors in your delectable compote, but also cuts through some of the sweetness with a little kick of acidity. Without lemon, your jam could become cloyingly sweet, and no matter how big of a sweet tooth you have, there is actually such a thing as something being too sweet. I learned that the hard way.

Processed with VSCO with s2 preset

I've said it before, and I will say it forever: I am at my utter best when making jam. Perhaps it's that it fills the home with such warm and sweet aromas that linger for hours. Or maybe it's because it's the closest I ever feel to my ancestors, the ones who lived in the real country in Tennessee, who knew the value of hard work, who foraged and canned not because it was on trend, but because it's just what was done. I feel like my great-grandmother is with me somehow when I'm standing over a bubbling pot, guiding me along, and introducing me to the Tennessee side of me. I call her Country Sydney, and I only get to see her when the sun's out and I'm frolicking outside in a field in a pair of wellies. I like Country Sydney  And I think my great-grandmother would, too.

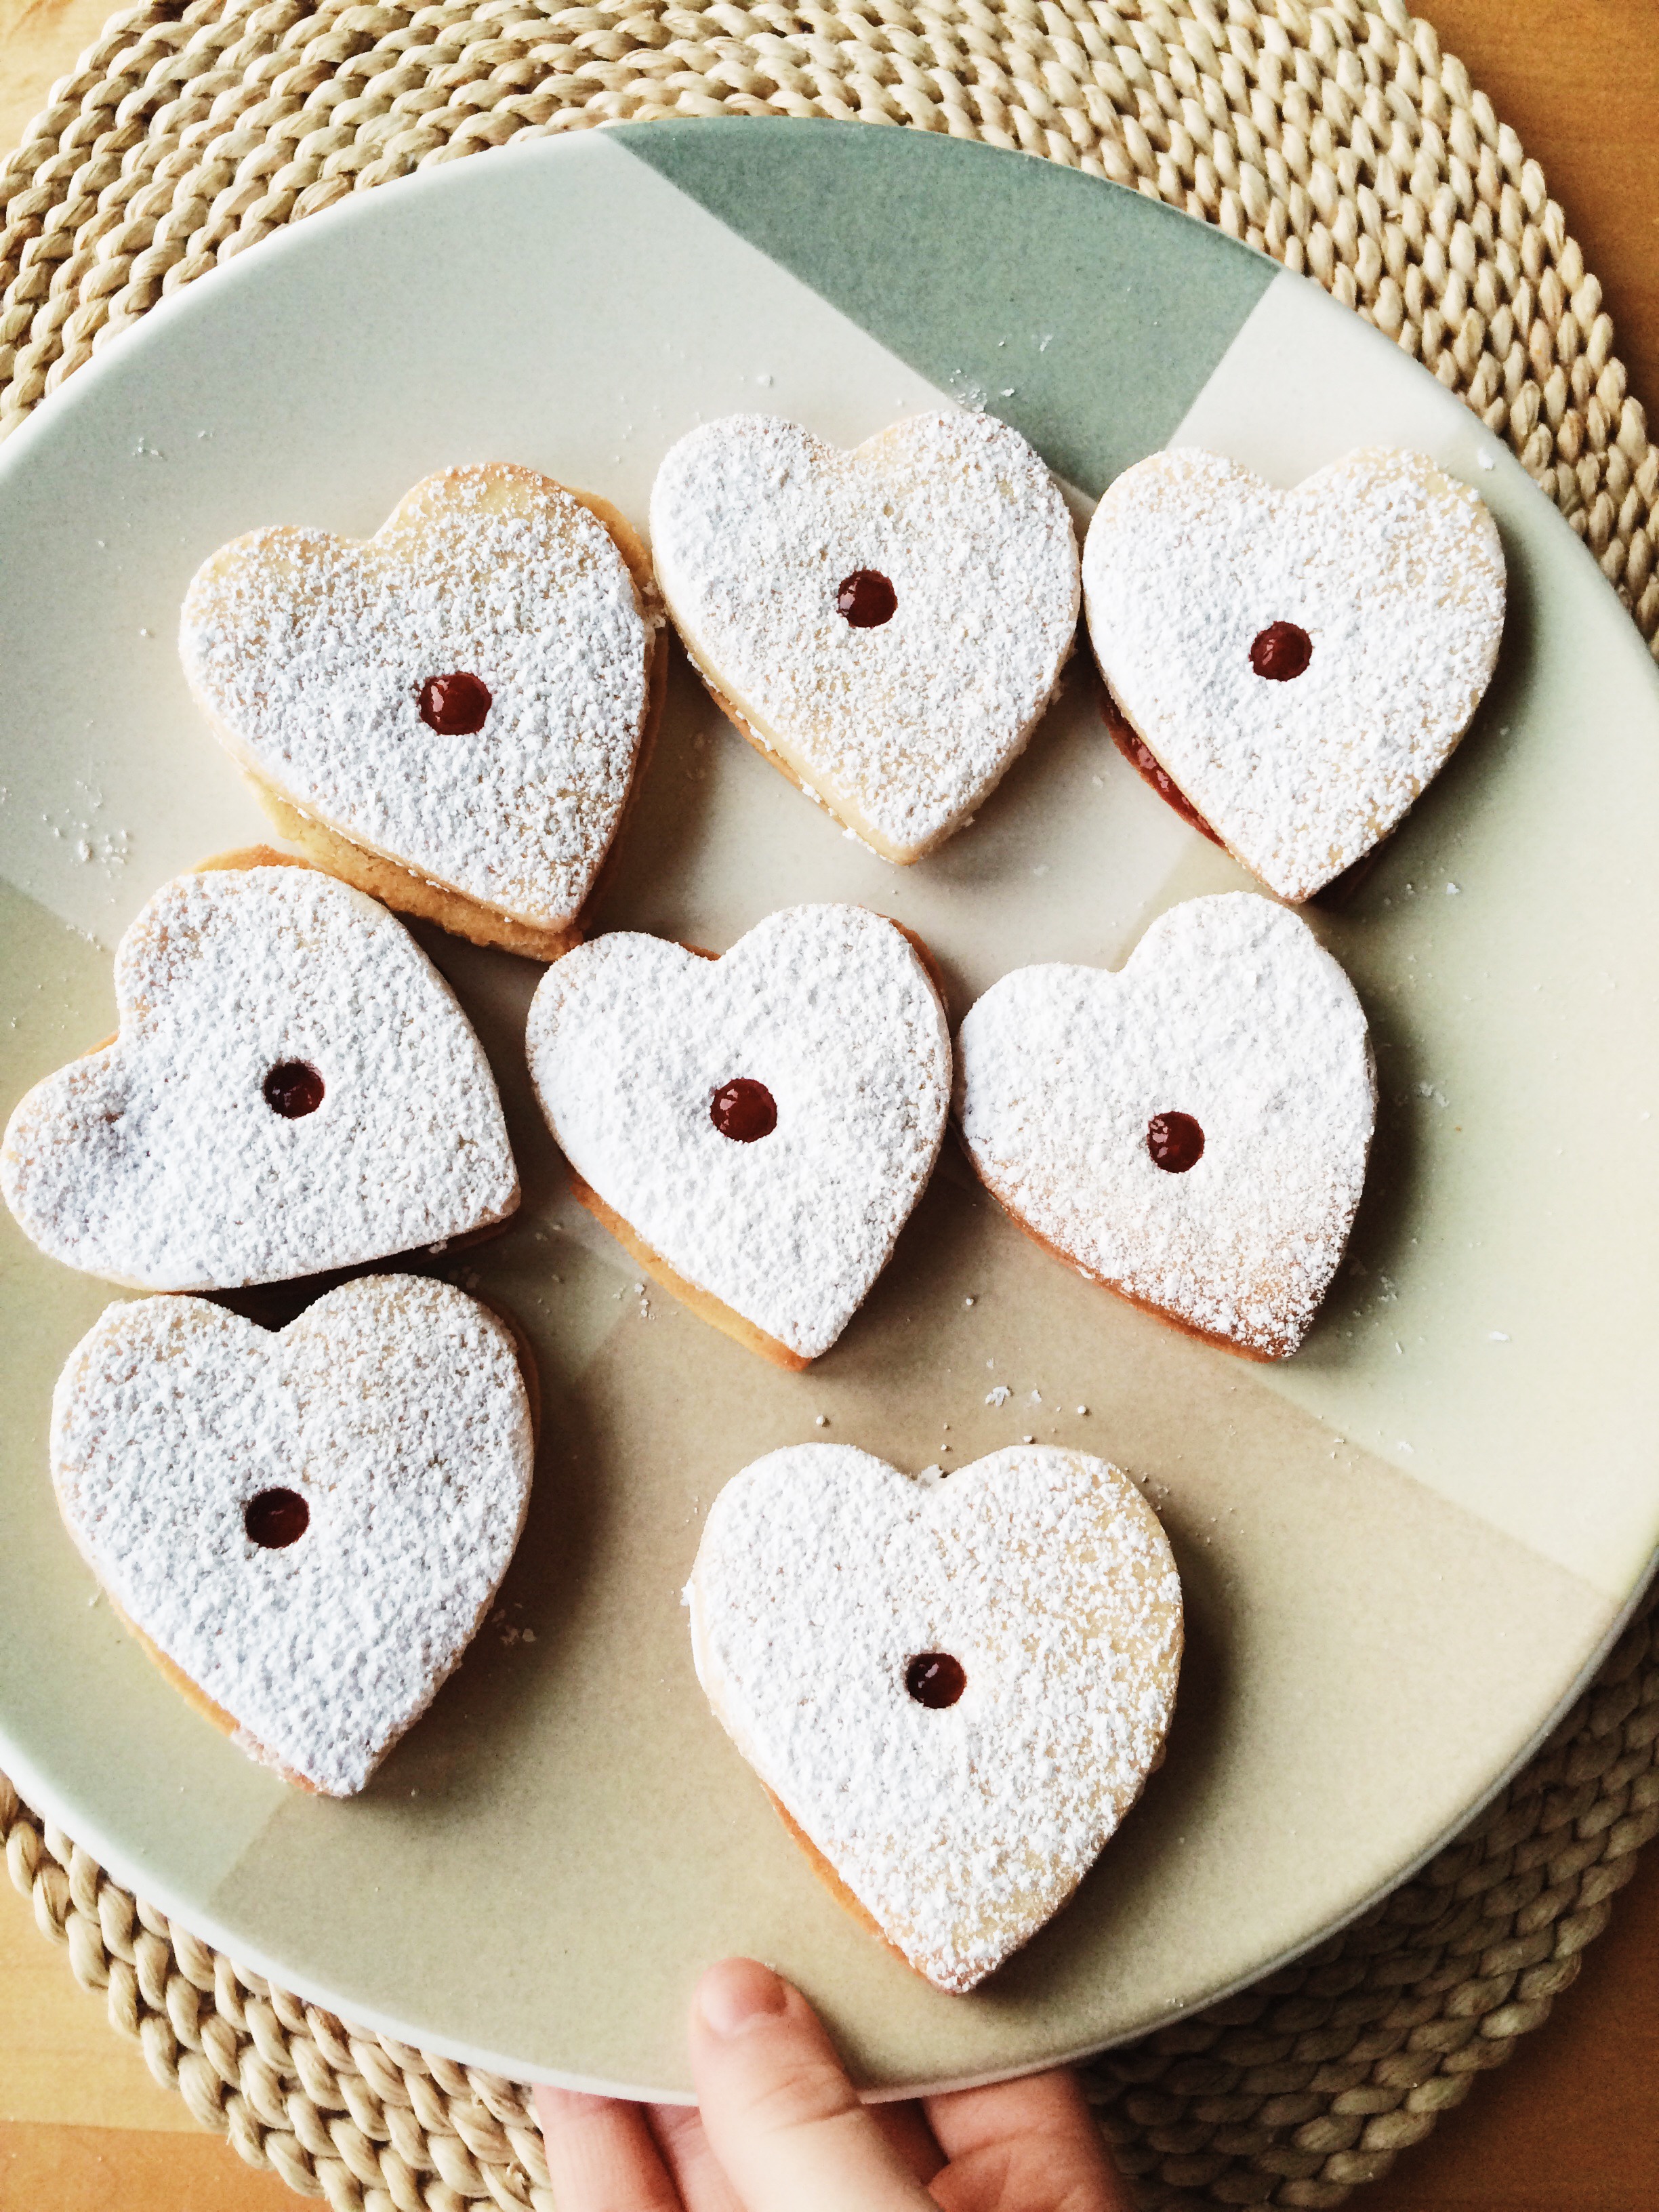
Great Granny Tiny, this peach jam is for you.


PEACH JAM 

What You'll Need:

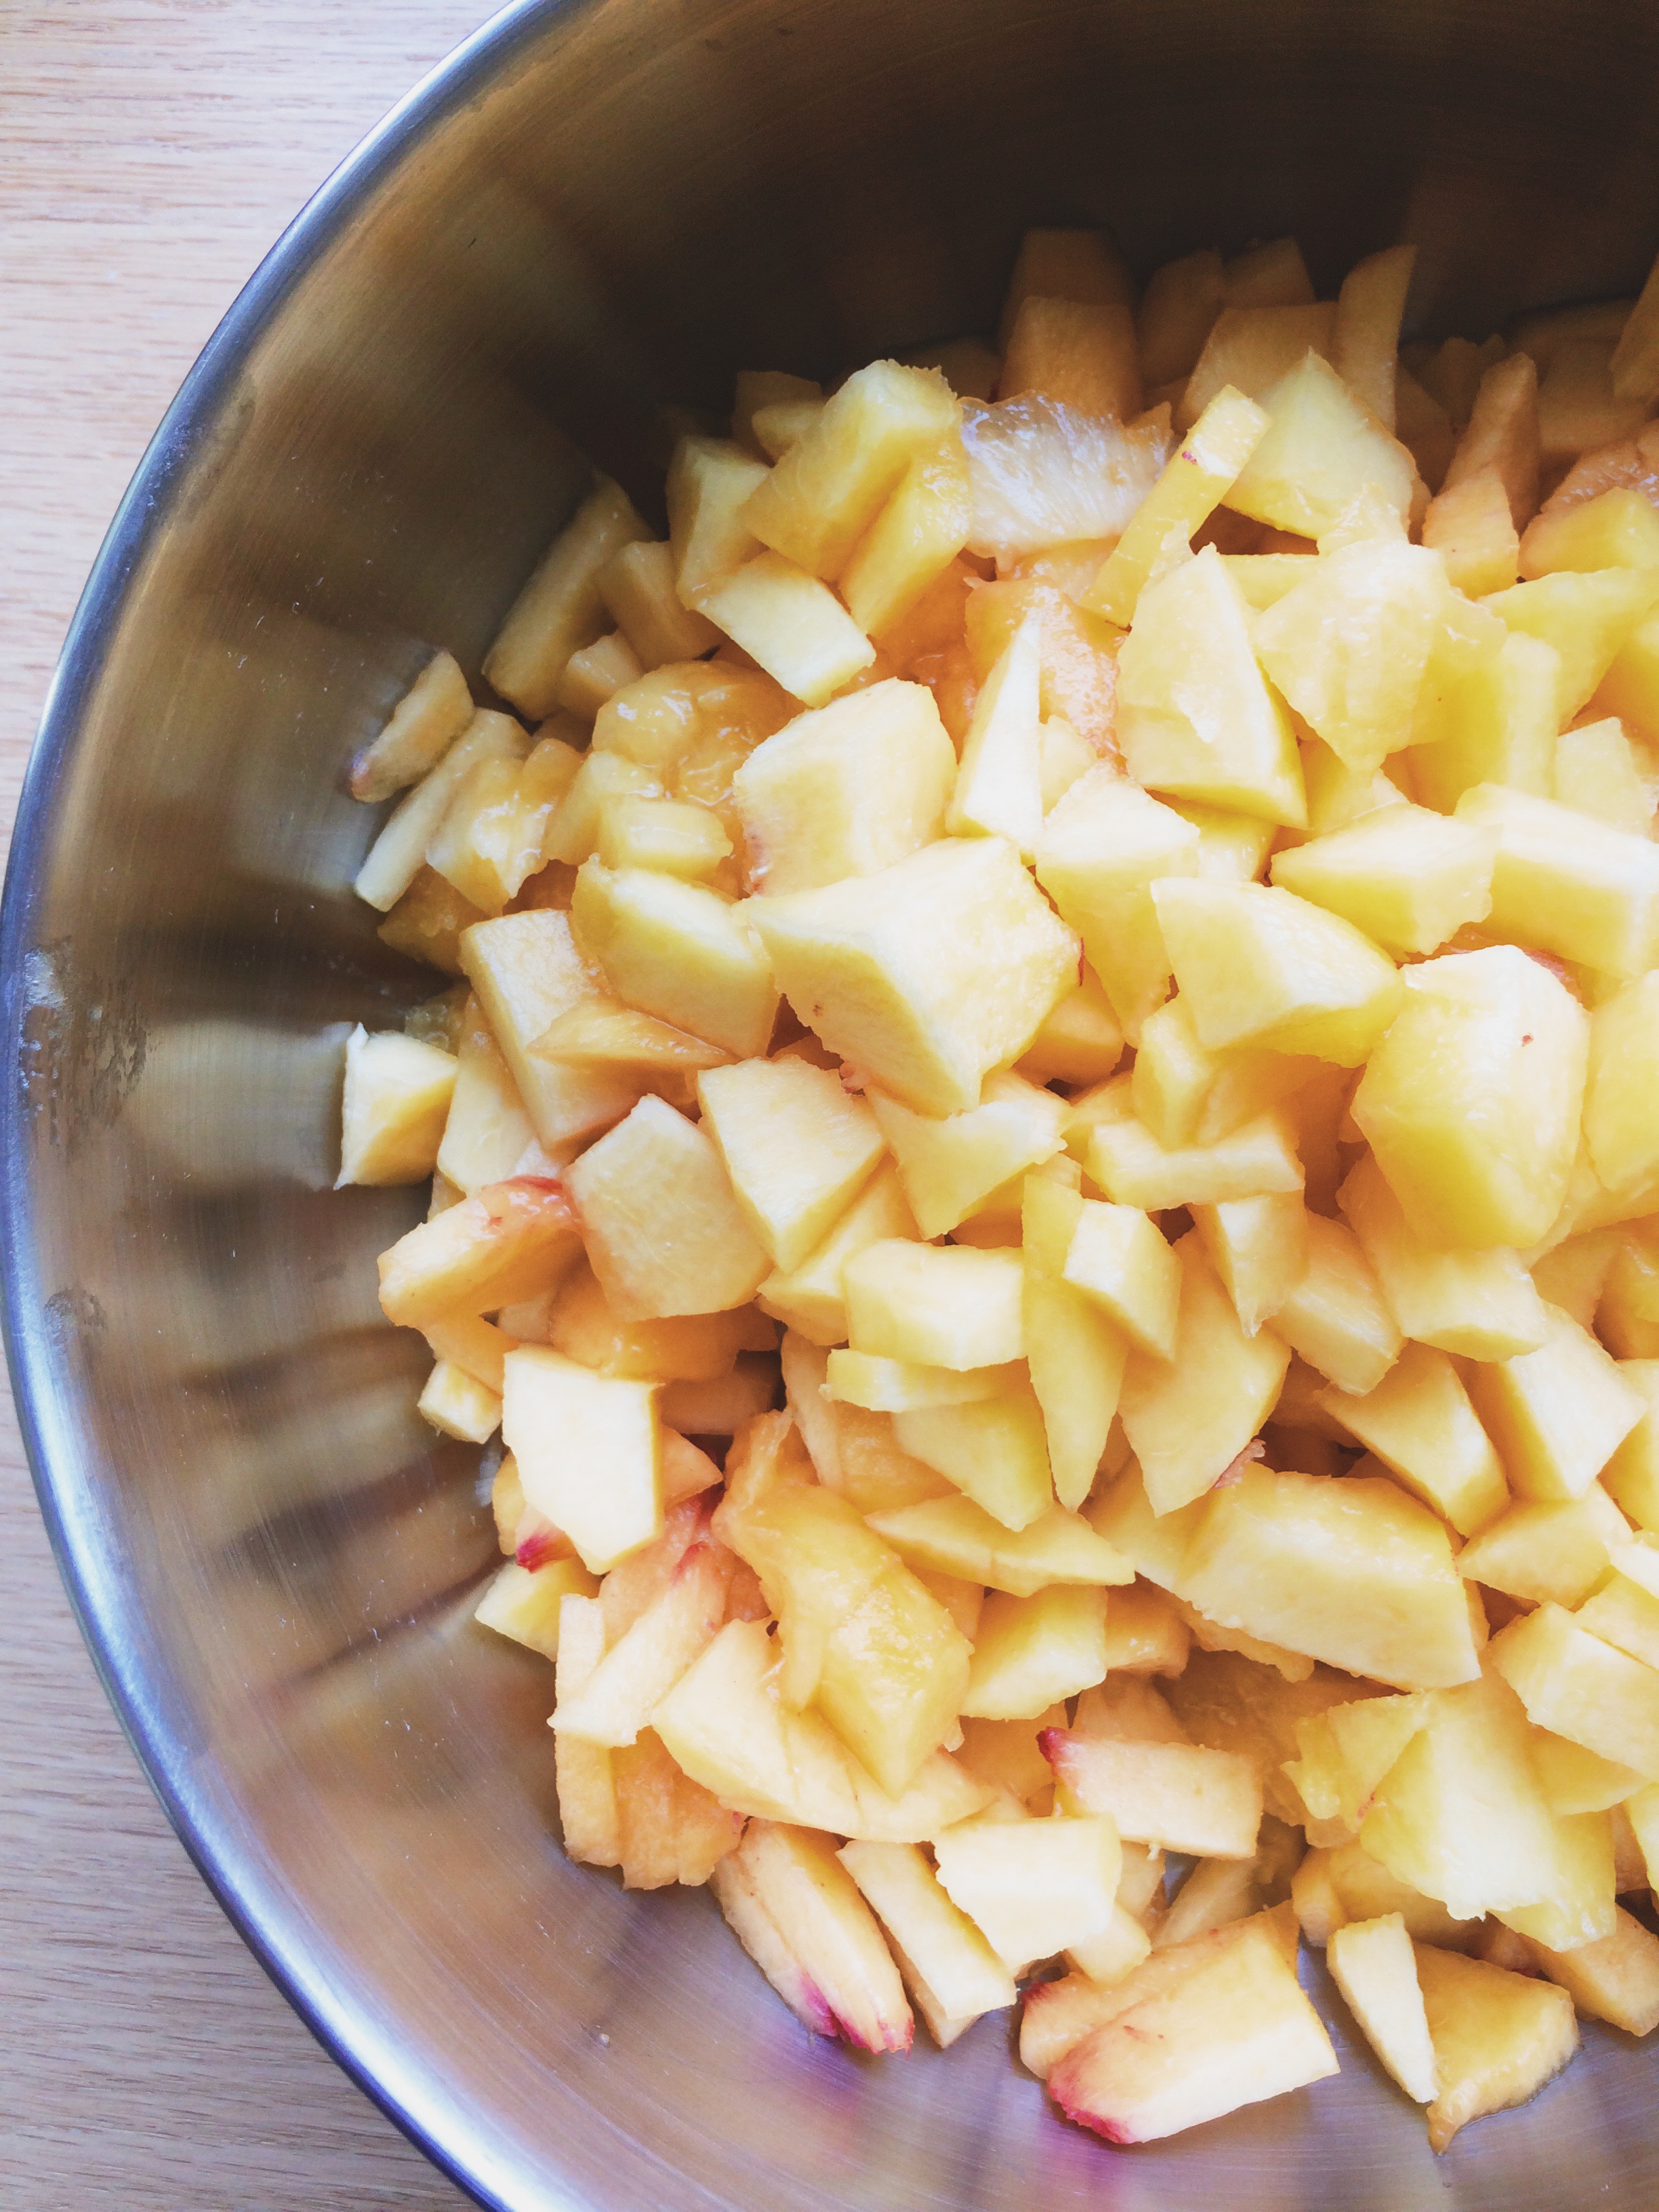
  • 6 peaches, peeled, pitted, diced
  • 1 cup (at least) brown sugar
  • Zest of 1 lemon, plus juice of (AT LEAST) half
  • Splash of vanilla, optional
  • Pinch of salt

DIRECTIONS

Add peaches, brown sugar, lemon zest, juice of half of a lemon, vanilla (if using), and pinch of salt to a medium sauce pan. Stir to combine.

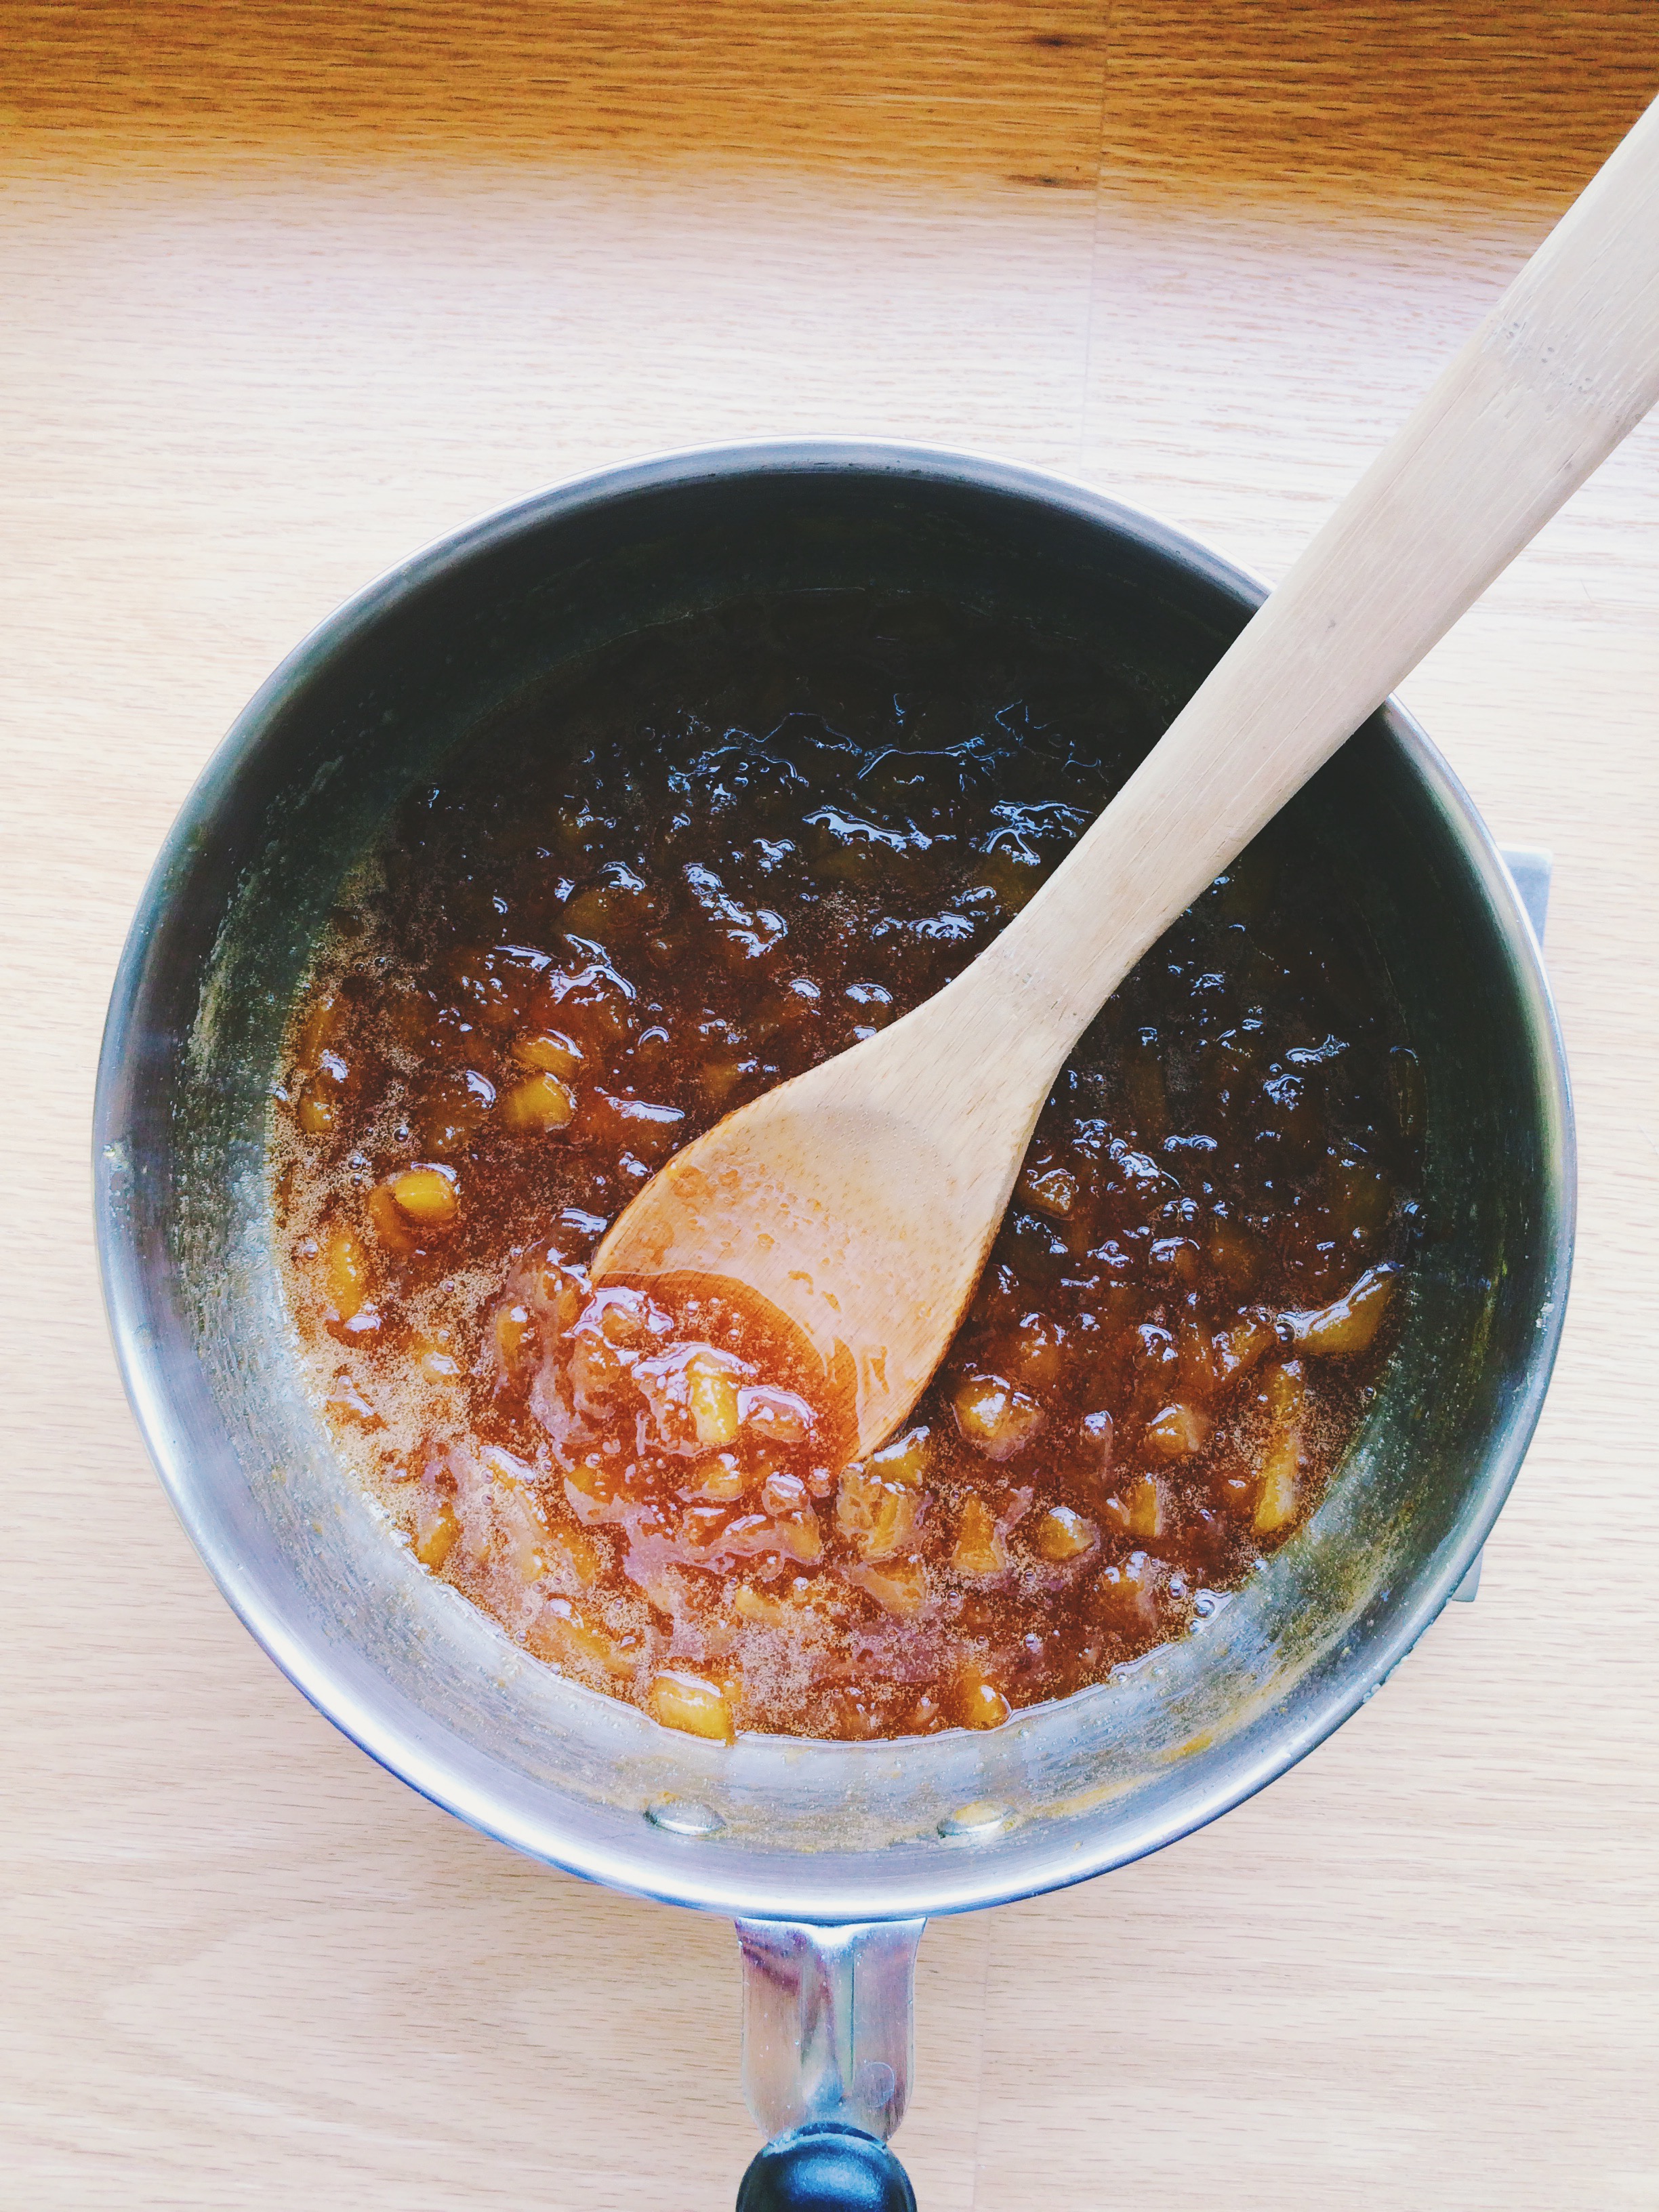
Cook the pan over medium-high heat, stirring frequently with a wooden spoon so that the sugar starts to dissolve, and the peaches begin to release their juices. Occasionally, mash the peaches with the back of your spoon to flatten them.  As the mixture starts to heat up, it will start bubbling rather vigorously, and maybe even spit up at your arm while you're stirring. Do not be alarmed. This is par for the course when you are creating delicious magic. DO NOT leave your jam at any time during this stage as it can go from fruit to burnt-beyond-belief in very, very little time.

Along the way, make sure to taste test. If the mixture is too sweet, add the other half of the lemon juice. If it's not sweet enough, add sugar by the teaspoon until it's sweet enough to your liking. (I tend to think that it's better to start off with less and add a little more, rather than start off with too much and not be able to fix it.)

Cooking time should be around 30-50 minutes depending on your stove. What to look for when seeing if your jam is done is whether or not it coats the back of the spoon. CAREFULLY draw a vertical line down the back. Has it left a defined line while the rest of your spoon is still coated with a thick jam? Yes? Congratulations, you've just passed the "line" test. Also, YOU HAVE PEACH JAM.

It's important to note that I prefer my jams on the "chunkier" side  because I like the differences in texture. If you are the same way, make sure that while there are still some little chunks of peaches, those chunks are completely soft. If you just want straight-up smooth jam, you can run it through a fine mesh sieve when it has cooled.

Once your jam has reached it's final stage, take it off the heat and let it cool in the saucepan before transferring to a clean mason jar. Store in the refrigerator.

The jam should keep in the refrigerator for several weeks.

Heart-Shaped Jammy Sammy Cookies

I know February 14th is long-gone, but I subscribe to Valentine's Day-cutesienss 365 days out of the year.

By the way, how was your Valentine's Day? Mine was surprisingly fun this year, which has freed me from the cycle of weird/awkward/disastrous scenes of Valentine's Day past. I volunteered at the an annual Sweetheart Dinner (last year I made this French Silk Pie), and had a BLAST. There were several courses involved, and no time to take a breath as we were each cooking over our respective dishes (I was on dessert duty but got roped into making seafood Alfredo once we got there). Lots of "behind"-s, and "this is ready to go out!"-s, and "We need more ginger ale for the punch!"-s were thrown out, and it reminded me of how much I love being in a busy kitchen. I live for that hustle and bustle sometimes. I mean, I've never dried so many dishes, or continuously scrubbed the same countertops so many times in my entire life, but MAN was it worth it. It was a really classy affair.

Would you like to know the best bit? These cookies were a BIG HIT!

"Jammy Sammie Cookies" is just the name that I wrote to be cute/slightly annoying. You're probably more familiar with the name "Linzer," because of the filling and shape cut out of the center. I generally see Linzer cookies the most during the Holiday Season, but if you ask me, the cookie cutout + filling pairing should be a yearlong affair. And what goes better with a heart shape on Valentine's Day than fresh strawberry jam? Red is like the official unofficial color of V-Day, so the filling of these cookies were required to match accordingly.

Quick question: how do you feel about homemade jam? Me? I'm all about it. I feel like there's nothing that makes me feel cozier than when I'm making jam from scratch. Sure, it takes way less time to just pick a jar off the shelf at your local grocery store, but when you make it yourself you: A) Know exactly what has gone into it, and B) MADE. IT. YOURSELF. Helloooooooo! It's (relatively) fast, (totally) easy, (unbelievably) fresh, and you know it's always made with love.

Now pair that sweet, sweet jam with some deliciously soft shortbread plus a liberal sprinkling of powdered sugar for good measure, and you've got the stuff of dreams, kids. What could be better?

Since you'll definitely have jam left over after filling the cookies, might I make a few suggestions as to what to use it on?

  1. Biscuits
  2. Scones
  3. Toast
  4. Fingers dipped in
  5. By the spoonful
  6. etc. etc.

And let's just quickly talk about the versatility of these cookies, shall we? Yes, they were made for February 14th, but they can go wayyy beyond that. We're talkin' tea parties, birthday parties, bridal showers, picnics, breakfasts, coffee breaks, dates, etc. etc. Cookie hearts filled with homemade jam never go out of season.

It's a beautiful thing.


HEART-SHAPED JAMMY SAMMY COOKIES

What You’ll Need:

For the shortbread:

2 sticks unsalted butter, at room temperature

1 cup granulated sugar

1/4 teaspoon salt

1 large egg + 1 large egg yolk, room temperature

1 teaspoon vanilla extract

2 1/2 cups all-purpose flour

Powdered sugar for sprinkling

For the jam:

32 oz (two 16 oz containers) strawberries

1/2 cup + 1 tablespoon  brown sugar

Pinch of salt

Zest of 1 whole lemon + juice of half a lemon


DIRECTIONS:

First, let’s make the shortbread cookie dough:

 In the bowl of a stand mixer fitted with the paddle attachment (or a hand mixer, or a wooden spoon), add the butter, sugar, and salt and beat until light and fluffy, about 3-5 minutes. Add the egg and egg yolk one at a time, making sure each addition is well combined. Next, add the vanilla extract. Add the flour in three batches, making sure each addition is well combined (but don’t over-mix), before adding more flour. When necessary, scrape down the sides of the bowl using a rubber spatula.

Once your dough has just come together, lay your dough out on a plastic sheet, then divide it in half. Wrap each half tightly in plastic wrap, then shape to form discs. Refrigerate the discs for at least one hour, but best is overnight.

Ok, dough’s done, now let’s make the jam:

Rinse strawberries before using, and let drain completely before getting started.

Once your strawberries have been washed, hull each strawberry, then cut into quarters. Place all of your cut up strawberries in a medium sauce pan. Next, add your brown sugar, pinch of salt, lemon zest, and lemon juice. Using a potato masher (or the back of a wooden spoon), muddle all of your ingredients together, making sure that the berries’ juices are starting to release, and your sugar and salt have started to dissolve.

Cook your fruit compote, stirring frequently, over medium-high heat until your jam has thickened, and it passes the line test (a line can be drawn down the center of the spoon without the juices running); On my stove, that takes about 30-35 minutes. Along the way, make sure to give your jam a few taste tests, and adjust the flavors to your liking. The mixture will bubble quite a bit and juice may jump out of the pan occasionally, so watch out for that!

When your jam has come together, take it off the heat and let it cool completely before transferring it to a mason jar or tupperware container.

This jam will last for several weeks refrigerated.

VERY IMPORTANT: DO NOT leave the stove whilst you’re making your jam. One minute it can still be too runny, then the next you’re cleaning burnt strawberry syrup out of the pan until your arms fall off. Trust me. Stay put. Keep stirring.

Ok, my dough has rested. Time to make some cookies!

Preheat the oven to 375 degrees F, and line two baking sheets with parchment paper. Set aside.

Remove the first disc of dough and let sit on a counter for ten minutes; this allows it to come to room temperature, thus making it much easier to roll out.

Liberally flour a rolling pin and work surface.

Roll the cookie dough out to a 1/8 inch thickness, then, using a floured heart-shaped cookie cutter, cut out shapes. Transfer the hearts to the cookie sheets lined with parchment paper, about 1-inch apart. Stamp a hole out of the center of half the cookies using the tip of a circle piping tip. Repeat the process with any remaining scraps, and with the second disc of dough.

Bake the cookies one sheet at a time for 7-10 minutes (depending on your oven),  or until the cookies have started to lightly brown around the edges. Allow the cookies to cool for five minutes on the baking sheet before transferring them to wire racks to cool completely.

Transfer the cookies with the holes cut out of the center to one of the cool baking sheets (keep the parchment paper on). Sprinkle a generous amount of powdered sugar over them using a sifter, mesh strainer, or powdered sugar shaker. (Aren’t you glad you have the parchment paper now to catch the excess sugar?) Flip the bottom cookies (no holes in them) over so that the underside is facing you, then apply about a teaspoon of jam right in the center of each. Place the tops on, then lightly press down so that you create a sandwich. The jam should spread evenly to the edges and through the center hole without overflowing. Enjoy!

To Store: Refrigerate in an airtight container for up to a week.


SOURCE: Adapted from A Cozy Kitchen

Food 52's Quick Blueberry Jam

Jam1 I think I spoke too soon about Spring. My bad. Historically, when I've made decorations of Spring, and thrown my winter coat into the closet abyss until the next season, that was usually that. I may shiver a bit, but there's usually no turning back. This year, not so much. No sooner had I stopped wearing stockings with my sneakers again that it snowed. Mind you it was a just dusting, but there was snow on the ground again, and a frost in the air that was totally and completely unwanted. Usually I relish in the sound of freshly fallen snow under my boots, but not when those boots were meant to be tucked away in exchange for attractive flats and sandals. Thankfully, it's already melting. Melt faster!

At any rate, despite the fact that I've had to put up with the winter coat for the time being, I've decided to ignore these winter-like conditions where it counts: in my heart. And to that effect, I've continued on in my quest to re-introduce warm weather fruits back into the kitchen any way I can. And I'm still on a blueberry kick. So, this week I've made Food 52's Quick Blueberry Jam. And it was, by all accounts, a real JAM to make....I LIKE PUNS, SUE ME.

Jam2

Jam has been on my extended To-Make List for several years now, but I hadn't gotten around to doing it, nor did I have all the proper accouterments it takes to effectively get the job done. While I still have long-term plans to fill my life and the lives of my loved ones with all the jams you could possibly imagine, until I have all the tools of the trade, this wonderful and easy quick jam is going to do very nicely in the meantime.

Quick Blueberry Jam Goes Well: on toast, rolls, biscuits, crackers, spoons, fingers, straight out of the pan, etc.etc. etc.

What You'll Need:

  • 1 cup fresh or frozen blueberries (if using frozen, make sure that they have completely thawed and come to room temperature)
  • 1/3 cup granulated sugar
  • 1/16 teaspoon kosher salt
  • 1/2 teaspoon lemon zest
  • 1 teaspoon lemon juice (I used upwards of 2 tablespoons, but I like a little bit more lemon with blueberries)
  • 2 tablespoons water

Directions:

Add all ingredients to a medium-sized pan.

Turn the heat to medium, and bring the mixture to a boil, stirring occasionally. As soon as it has come to a boil, turn the heat down to a simmer. The fruit will start to release its juices, and soften.

Cook up to 30 minutes (though I did a few minutes longer). The longer it simmers, the smoother the result at the end.

Store in fridge, and eat within a week.

Note: Because I upped the lemon juice, I also had to adjust the sugar by a few tablespoons, and add a dash more salt. Make sure to alter this to your taste preferences. ABT= Always be tasting. Think it needs a pinch more salt? Go for it! Want a little more acidity? Squeeze it in. It's your jam after all!

SOURCE: Food 52 via Phyllis Grant