Mini Atlantic Beach Pies

Living a stone's throw away from the Atlantic Ocean now has gotten me thinking about beach town culture. The locals around these parts are very set in their ways when the sun is shining and you haven't seen a thermometer drop past 80 degrees in a week. They get up when the sun rises, slather on a healthy coating of sport sunblock, then set up shop at the beach until the sun goes down. And once the sun goes down, if they've planned correctly, they'll have a bonfire on that very same beach. Lather, rinse, repeat.

They're fueled by frozen lemonades and hot dogs, and vow to be olympic-level good at beach volleyball and sailing everyday until their feet hit the pavement and reality sets in. Every minute is water, sand, and sun, and it's all incredibly new to me. Sure, in the town I grew up in, in the Midwest, we were lucky enough to live right by the Lake with beautiful beaches and our own fair share of summertime rituals, but it's just not the same. In the Midwest, fairs and festivals are the name of the game, and stuffing yourself to the very brim with authentic foods of many cultures is how you play to win. But not here. Here, ne'er a pretty Summer day is squandered indoors, and every moment a bull is taken by the horns and ridden all the way to where life begins and ends: the beach. I'll tell you what, it'll certainly take a little getting used to (first things first, I'll have to order a vat of SPF 70 off Amazon), but I plan to be alll about that life one day. Provided there are snacks. And the weather stays between 75 and 79 degrees, as I am prone to fits of hot weather-related complaining.

Can you believe that Summer is unofficially officially over?? Three months just whizzed past. If the humidity hadn't had its way with my hair from May to present day, I could almost tell you that it never happened at all. And while I'm more than delighted to welcome in my favorite season, Fall, with as many apple cider doughnuts, hay rides, pie baking, and cardigans and flannel as my lil' heart can take, I'm also a sucker for goodbyes. Why, it wasn't a mere seven months ago that I was tightly bundled up in a heavy winter coat, greedily bathing my face in the glow of a sun that only gave a whisper of warmth. And the days were short and dark, and I wished for Summer with every breath I took. But you can never appreciate or miss something until it's gone, so it's time for Summer to TTFN so I can remember what it was like to love it once more. To give it a proper adieu, I chose to make my favorite dessert: pie, in miniature form because who doesn't love a PERSONAL PIE, with a little wink and nod to my new-ish new home. Hello, Atlantic Beach Pie.

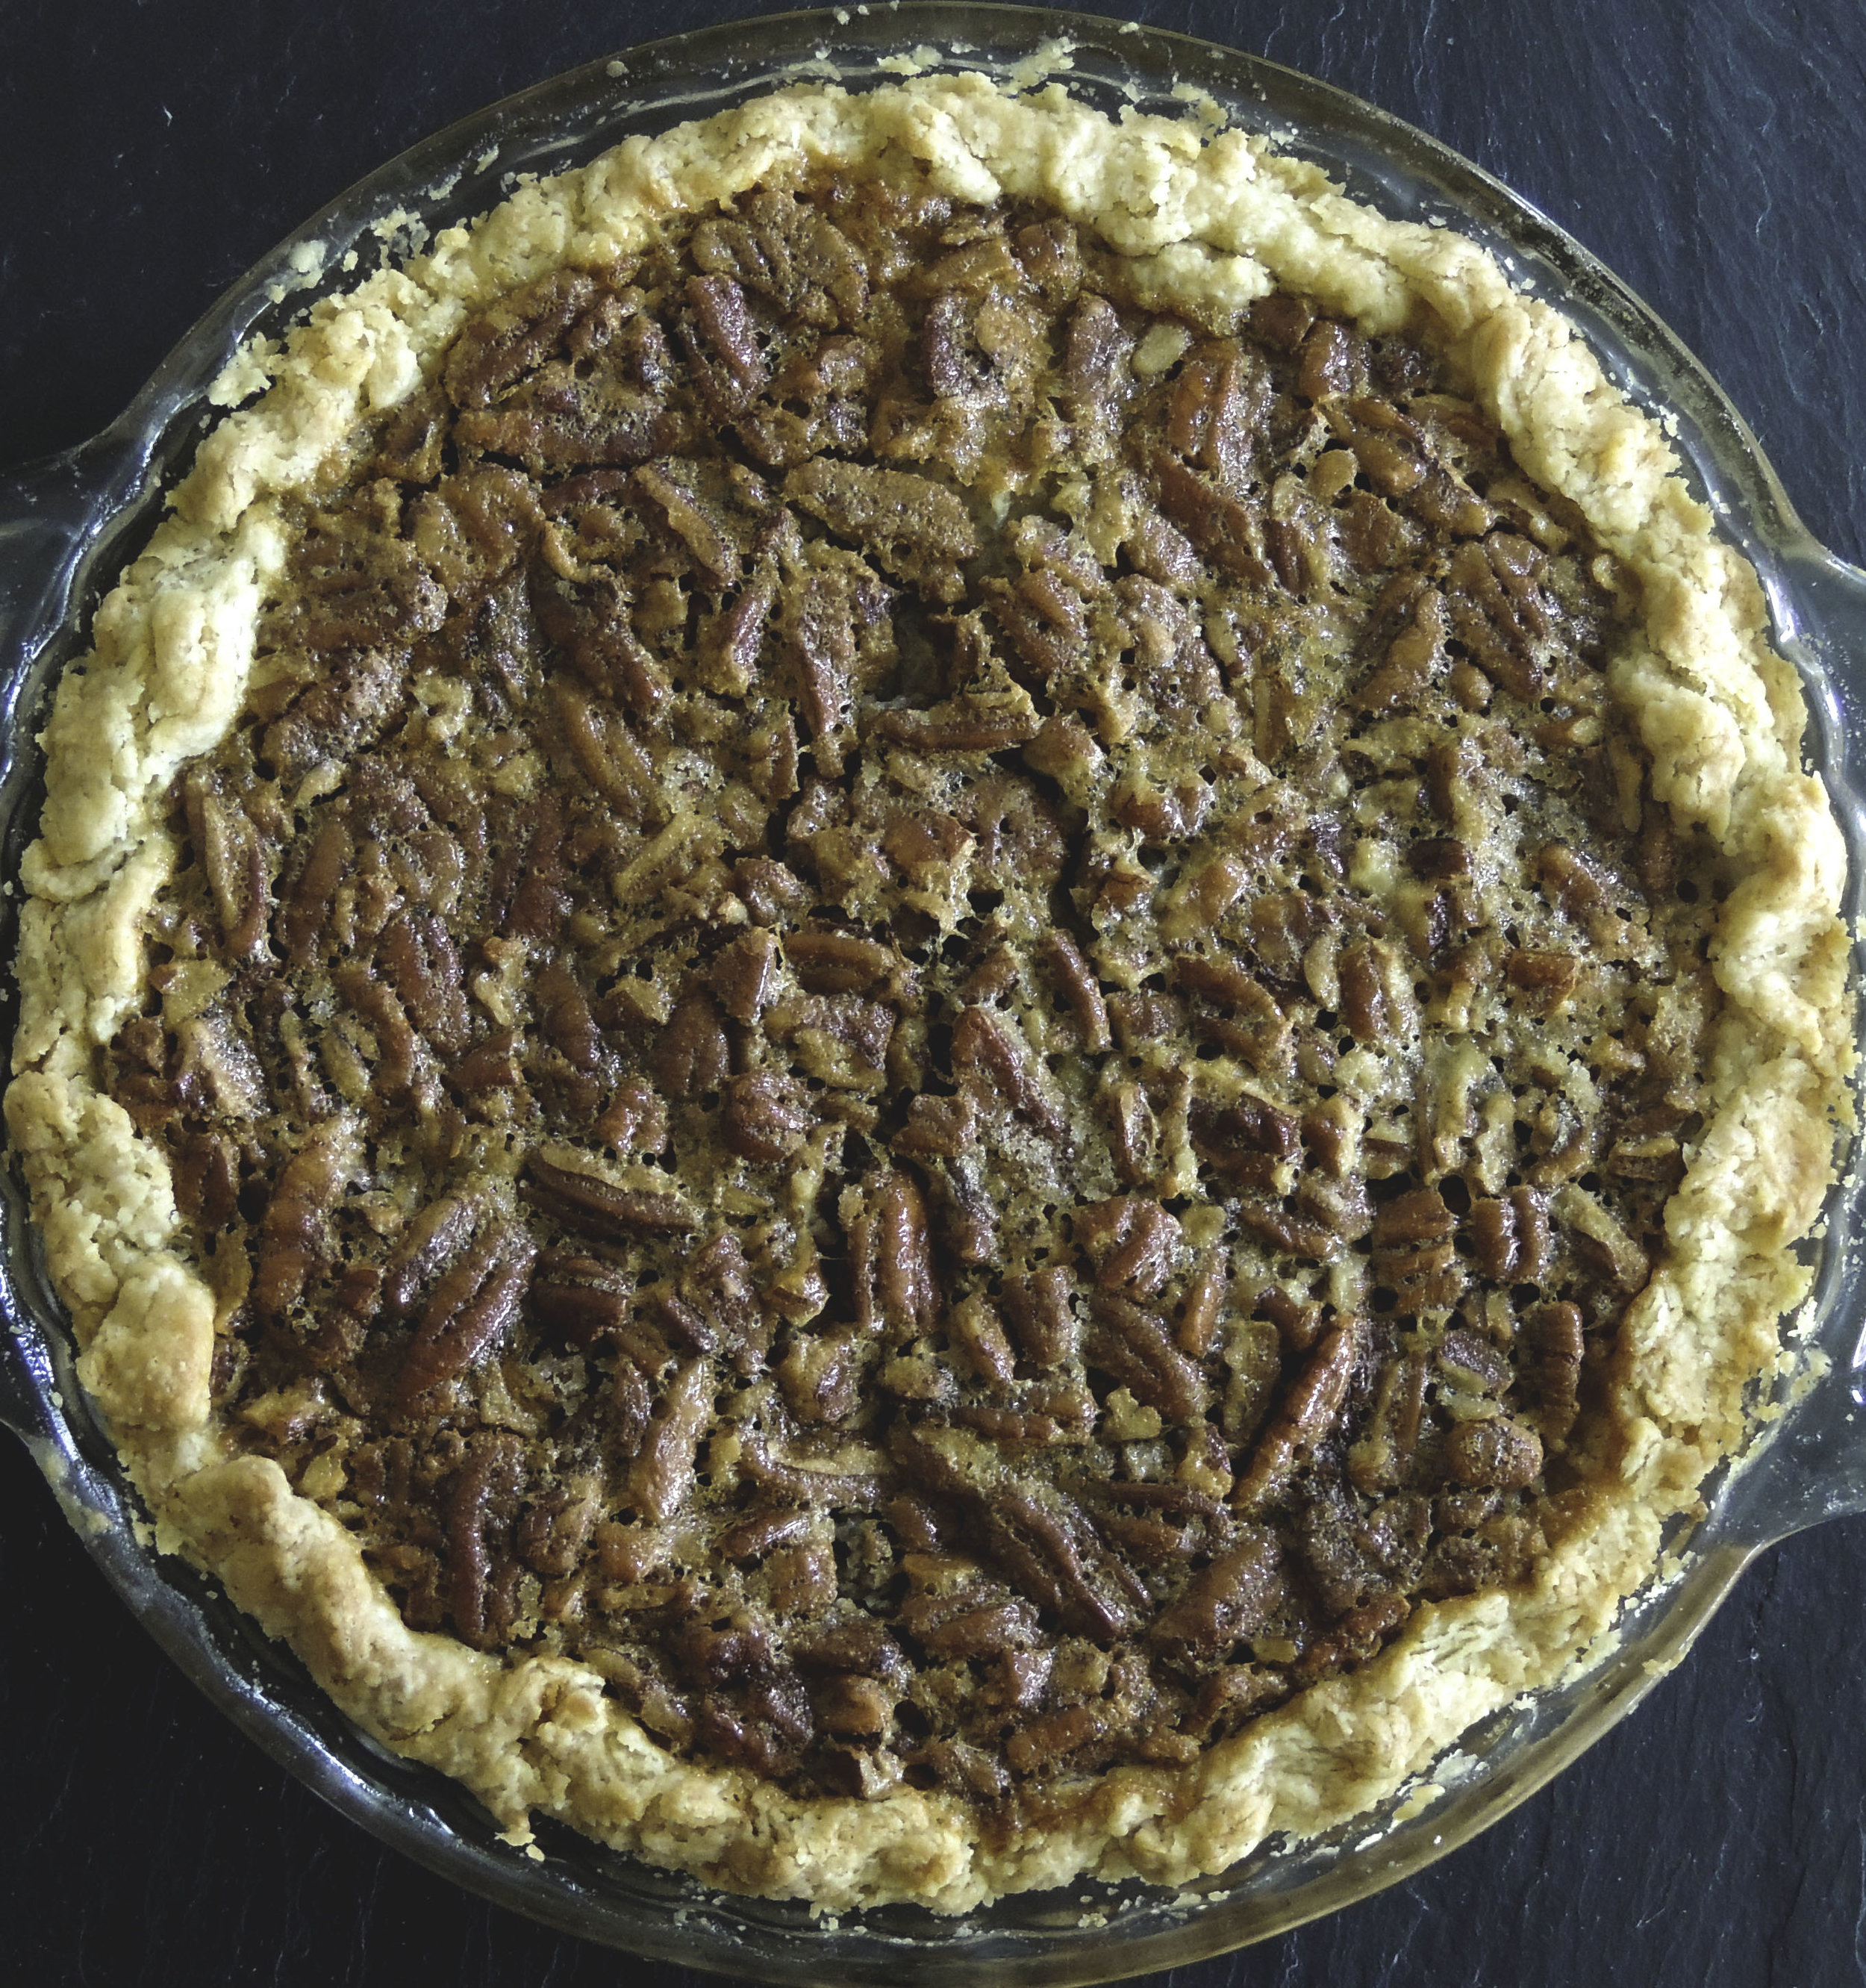
At its core, this Atlantic Beach Pie is the baby of a Key Lime pie and a Lemon Meringue pie. It has both lemon and lime juice, a saltine cracker crust, and delicious, over-the-top, fluffy and puffy meringue; if so you choose to whip up a batch and use it. (P.S. You'll have so many egg whites leftover. Make the meringue.)

There are many, many things that I love about these baby Atlantic Beach pies. For starters, the saltine cracker crust, a detour from the usual graham cracker crust found in basic Key Lime and Lemon Ice Box pies, reminds me of the beach, and transports me to those sunny sand-filled days everyone from my neighbor to the bank teller are always raving about. I love the freshness and brightness that the just-squeezed citrus juices bring to the table. The pies are so fragrant that even a quick whiff of one in passing can wake me right up. And most of all, these are pies that I can not only give to those friends and loved ones who absolutely adore citrus desserts, but also to those friends who *GASP* aren't dessert people. They're sweetened by a few tablespoons of sugar in the crust, and the sweetened condensed milk, and that's it. There's enough sweetness to keep your sweet-tooth happy, but overly-sweet they are not. It's a win-win for every party, and I can go to bed at night knowing that even the most savory-oriented people can compromise every once in a while. Plus, and I've said it before but I'll say it again: WHO DOESN"T LOVE PERSONAL PIES? They're just too cute to resist.

In conclusion, now is the time to raise our forks to a lovely, hot, and humid summer by digging into petite summer-tastic citrusy pies, and reminiscing about the good times. Cheers, Summer '16. It's been real.


Now, pass me that can of pumpkin, would ya? We've got work to do.


MINI ATLANTIC BEACH PIES

Makes 4 6-inch pies (these are the ones I use from WS!) 

What You'll Need:

For the crust:

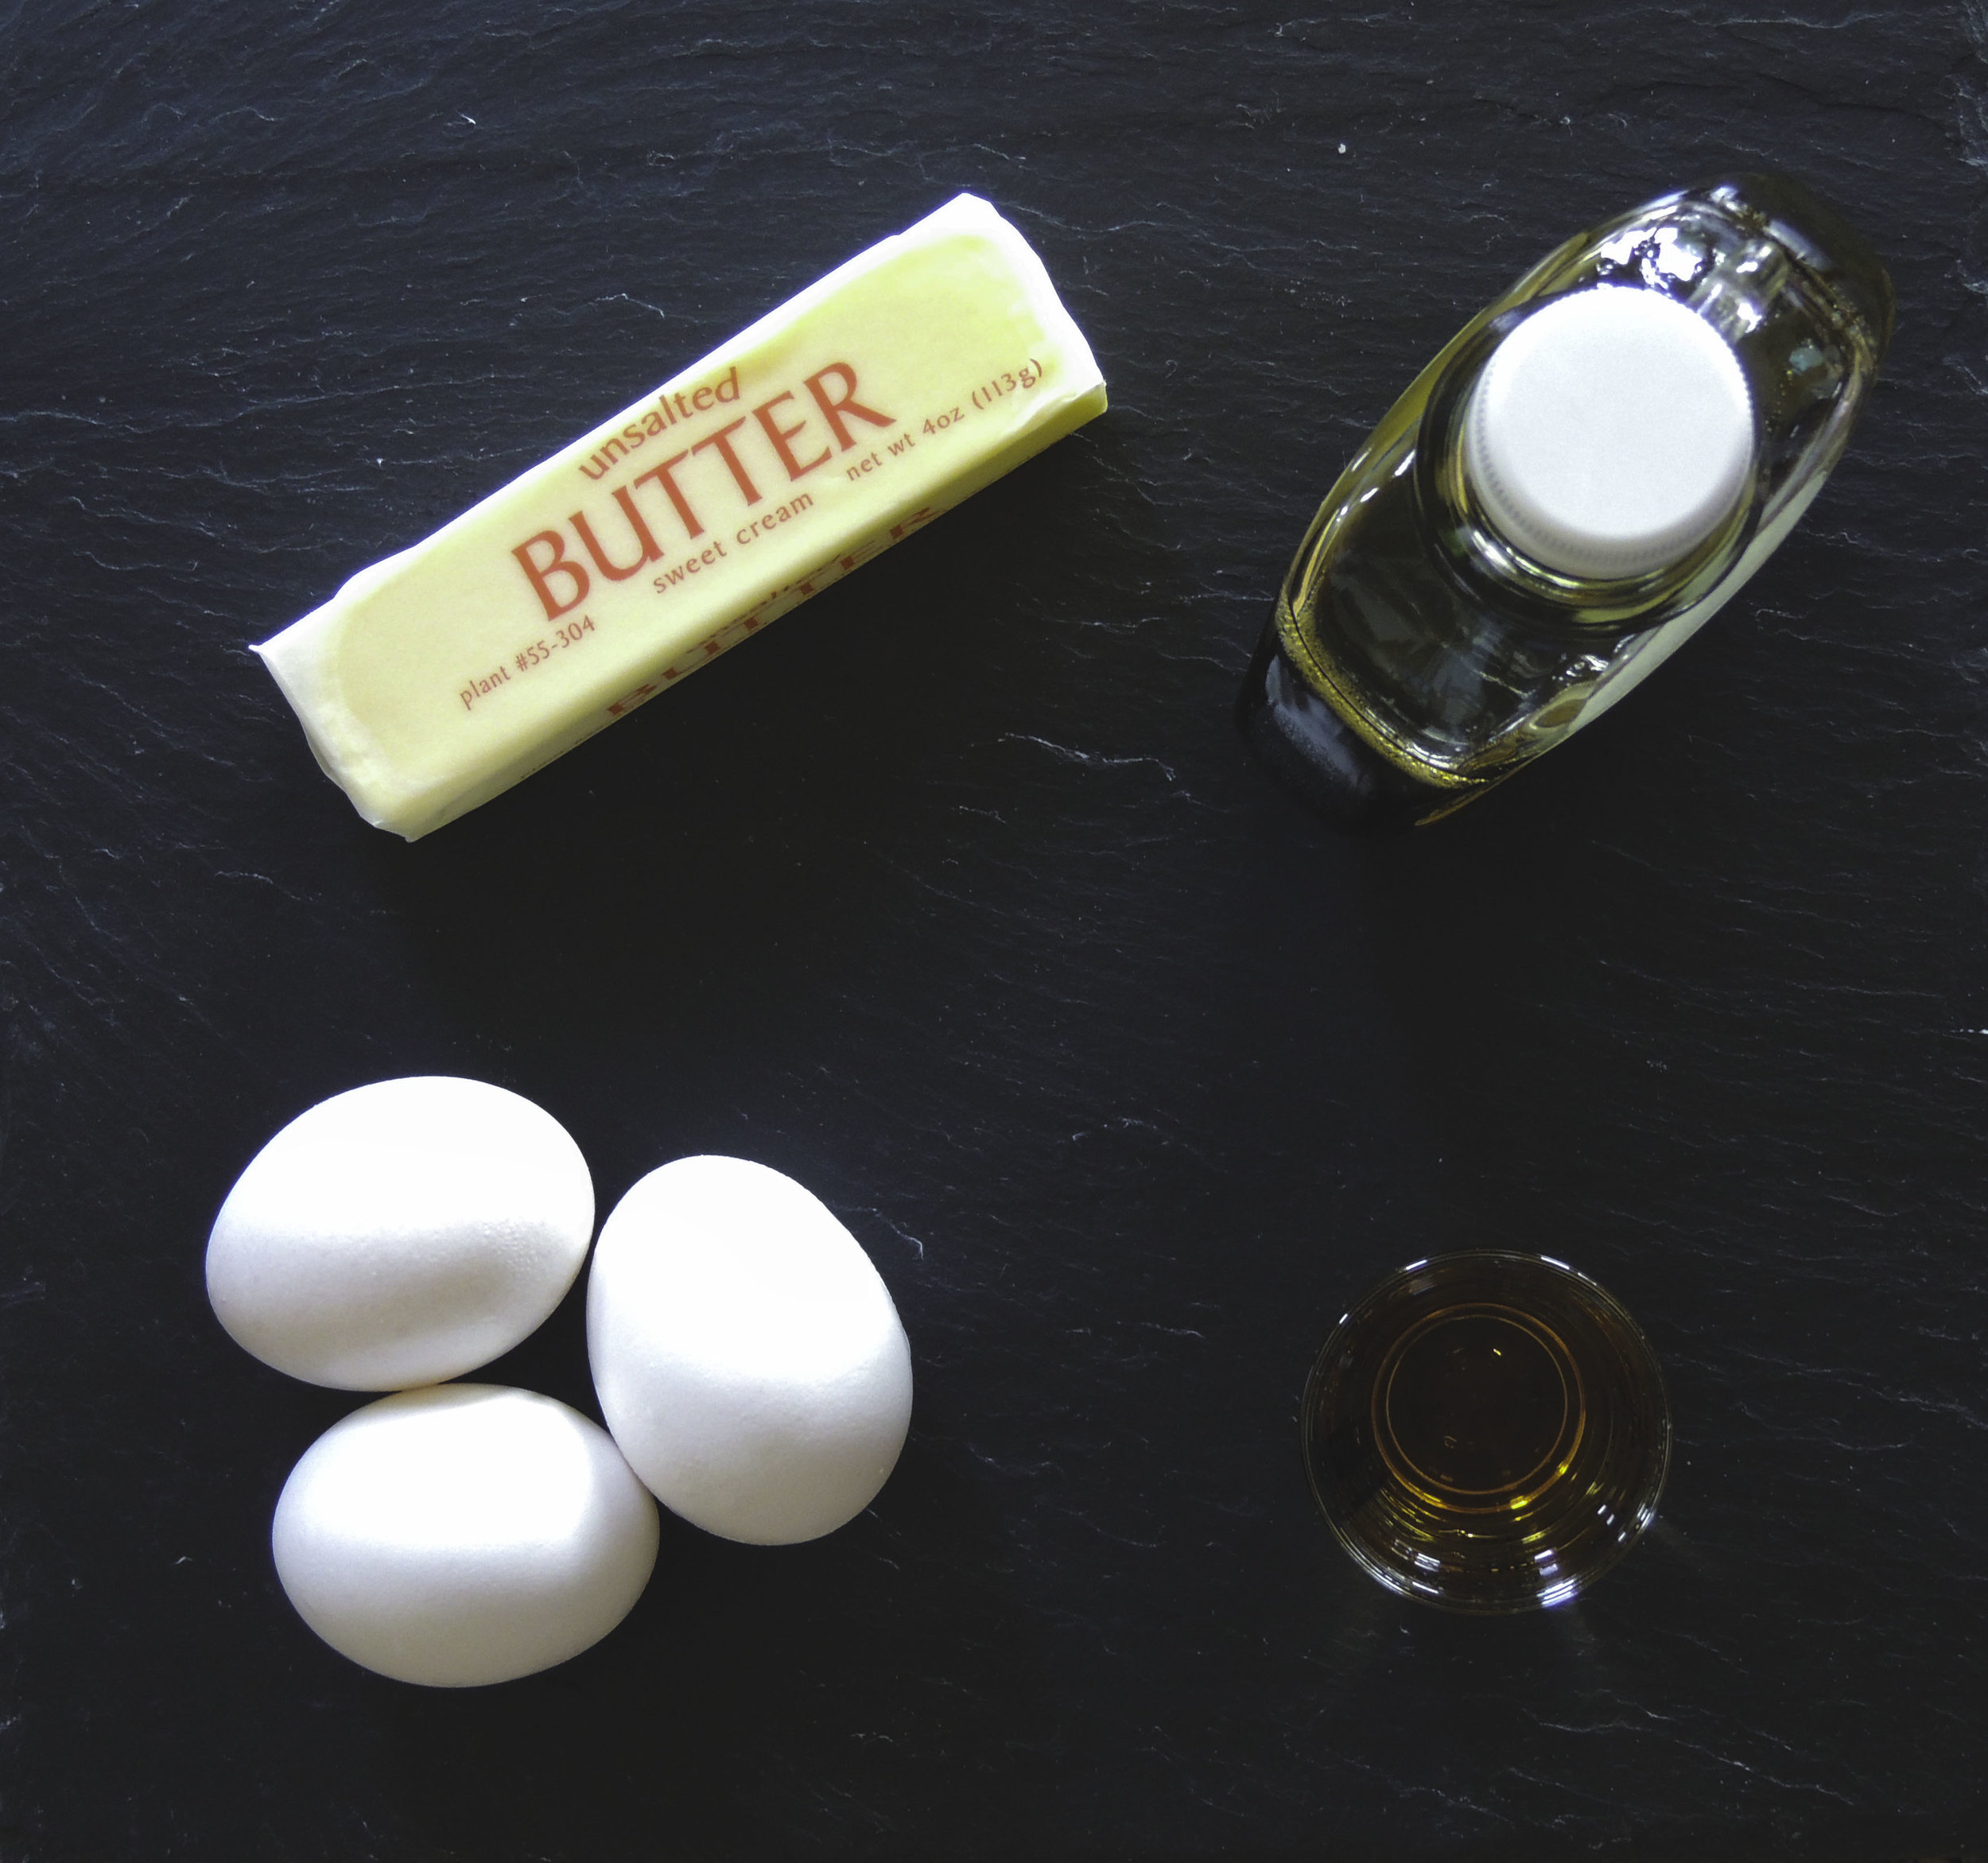
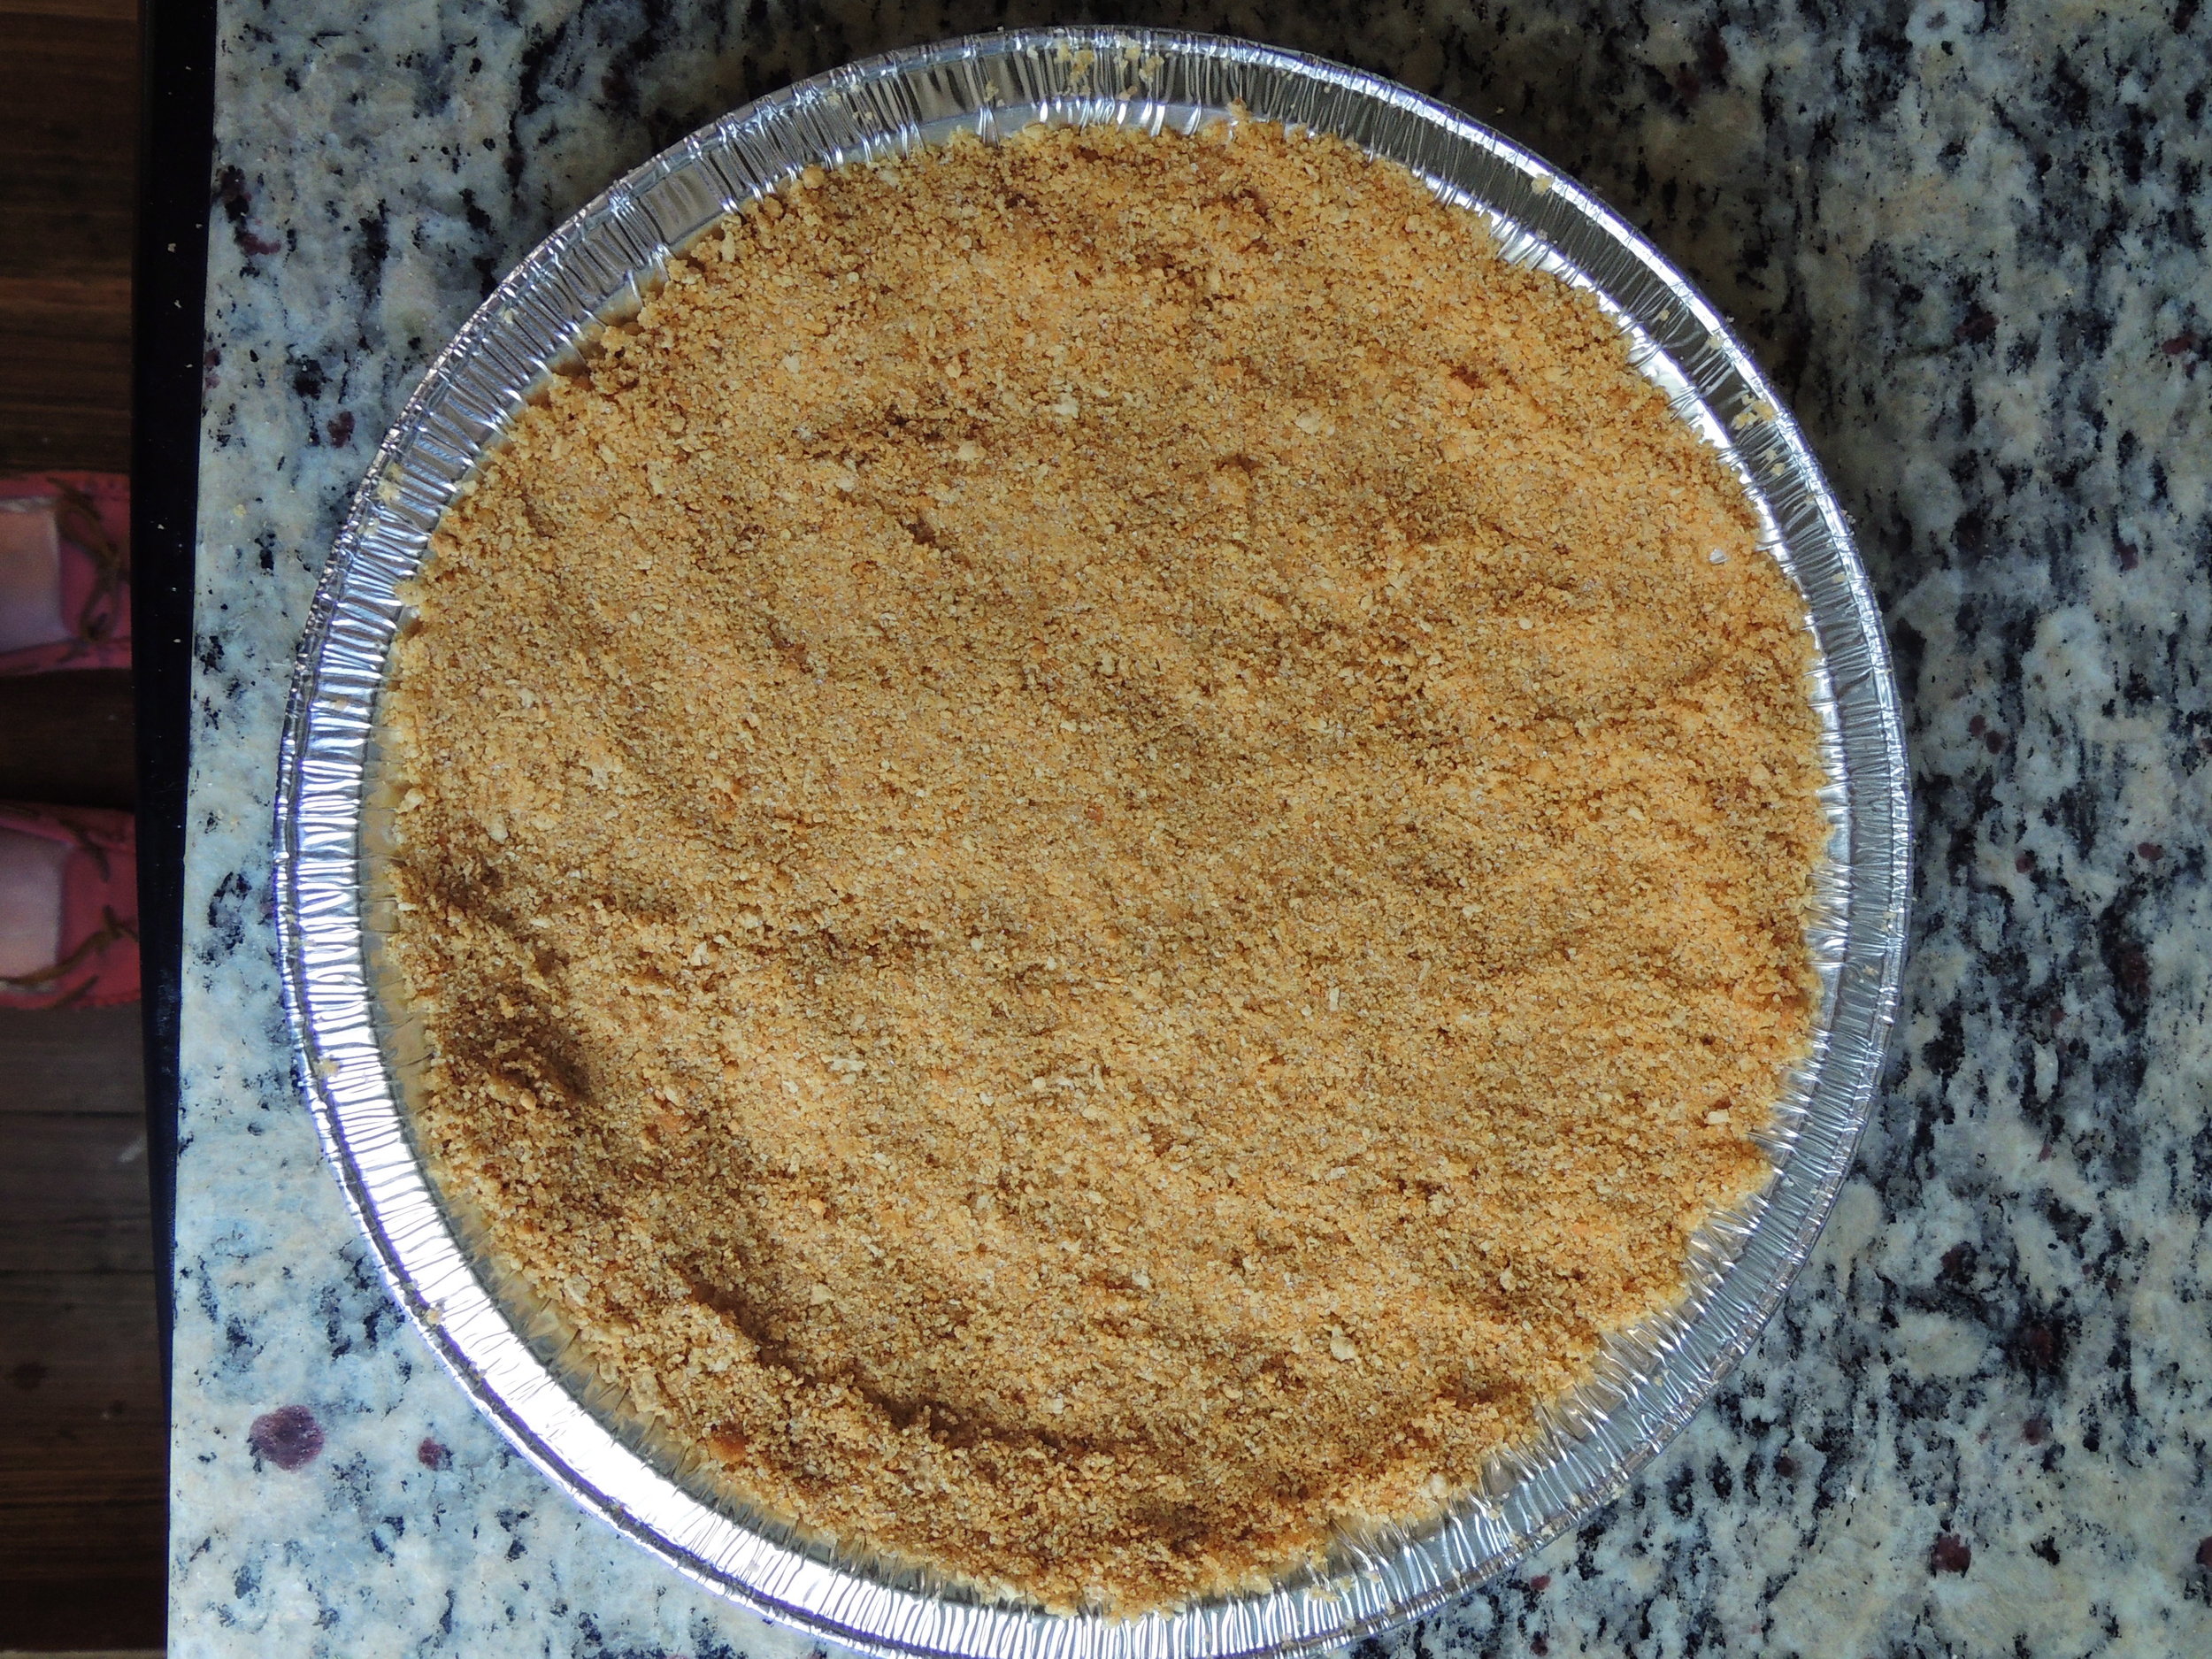
  • About 2 1/2 sleeves of salted saltine crackers, or about 120 crackers
  • 1 cup unsalted butter, softened
  • 6 tablespoons granulated sugar

For the pies:

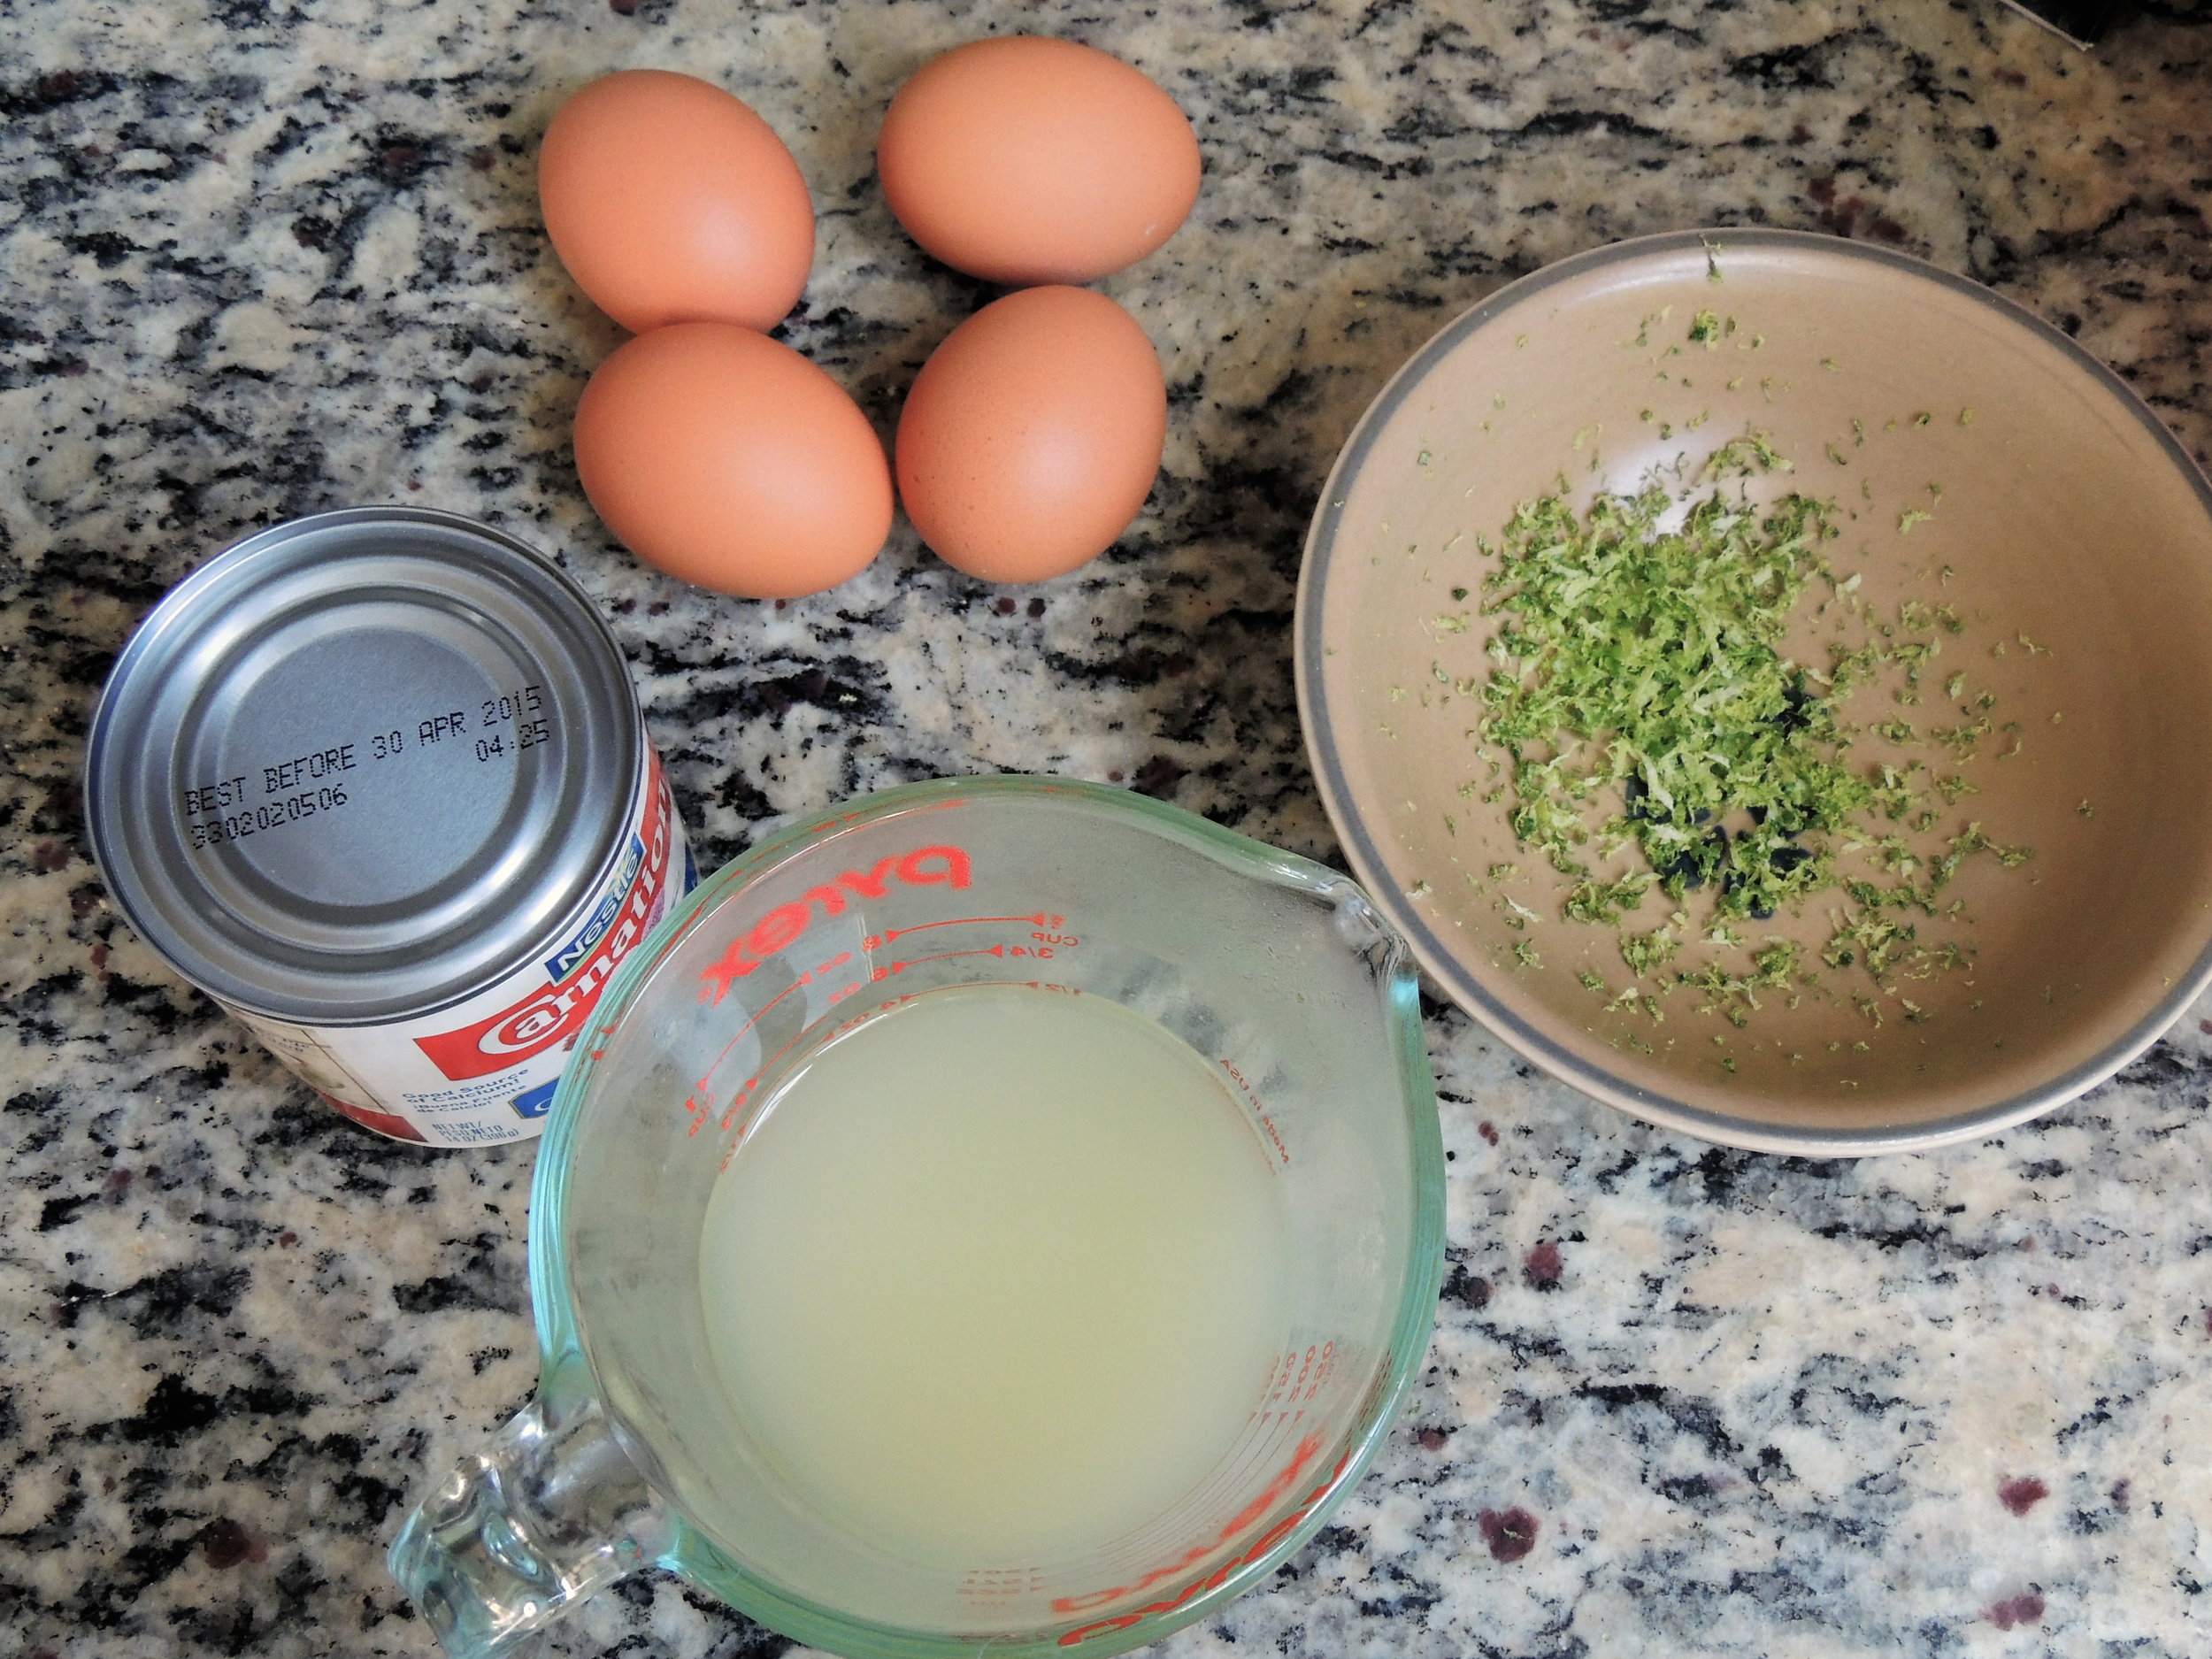
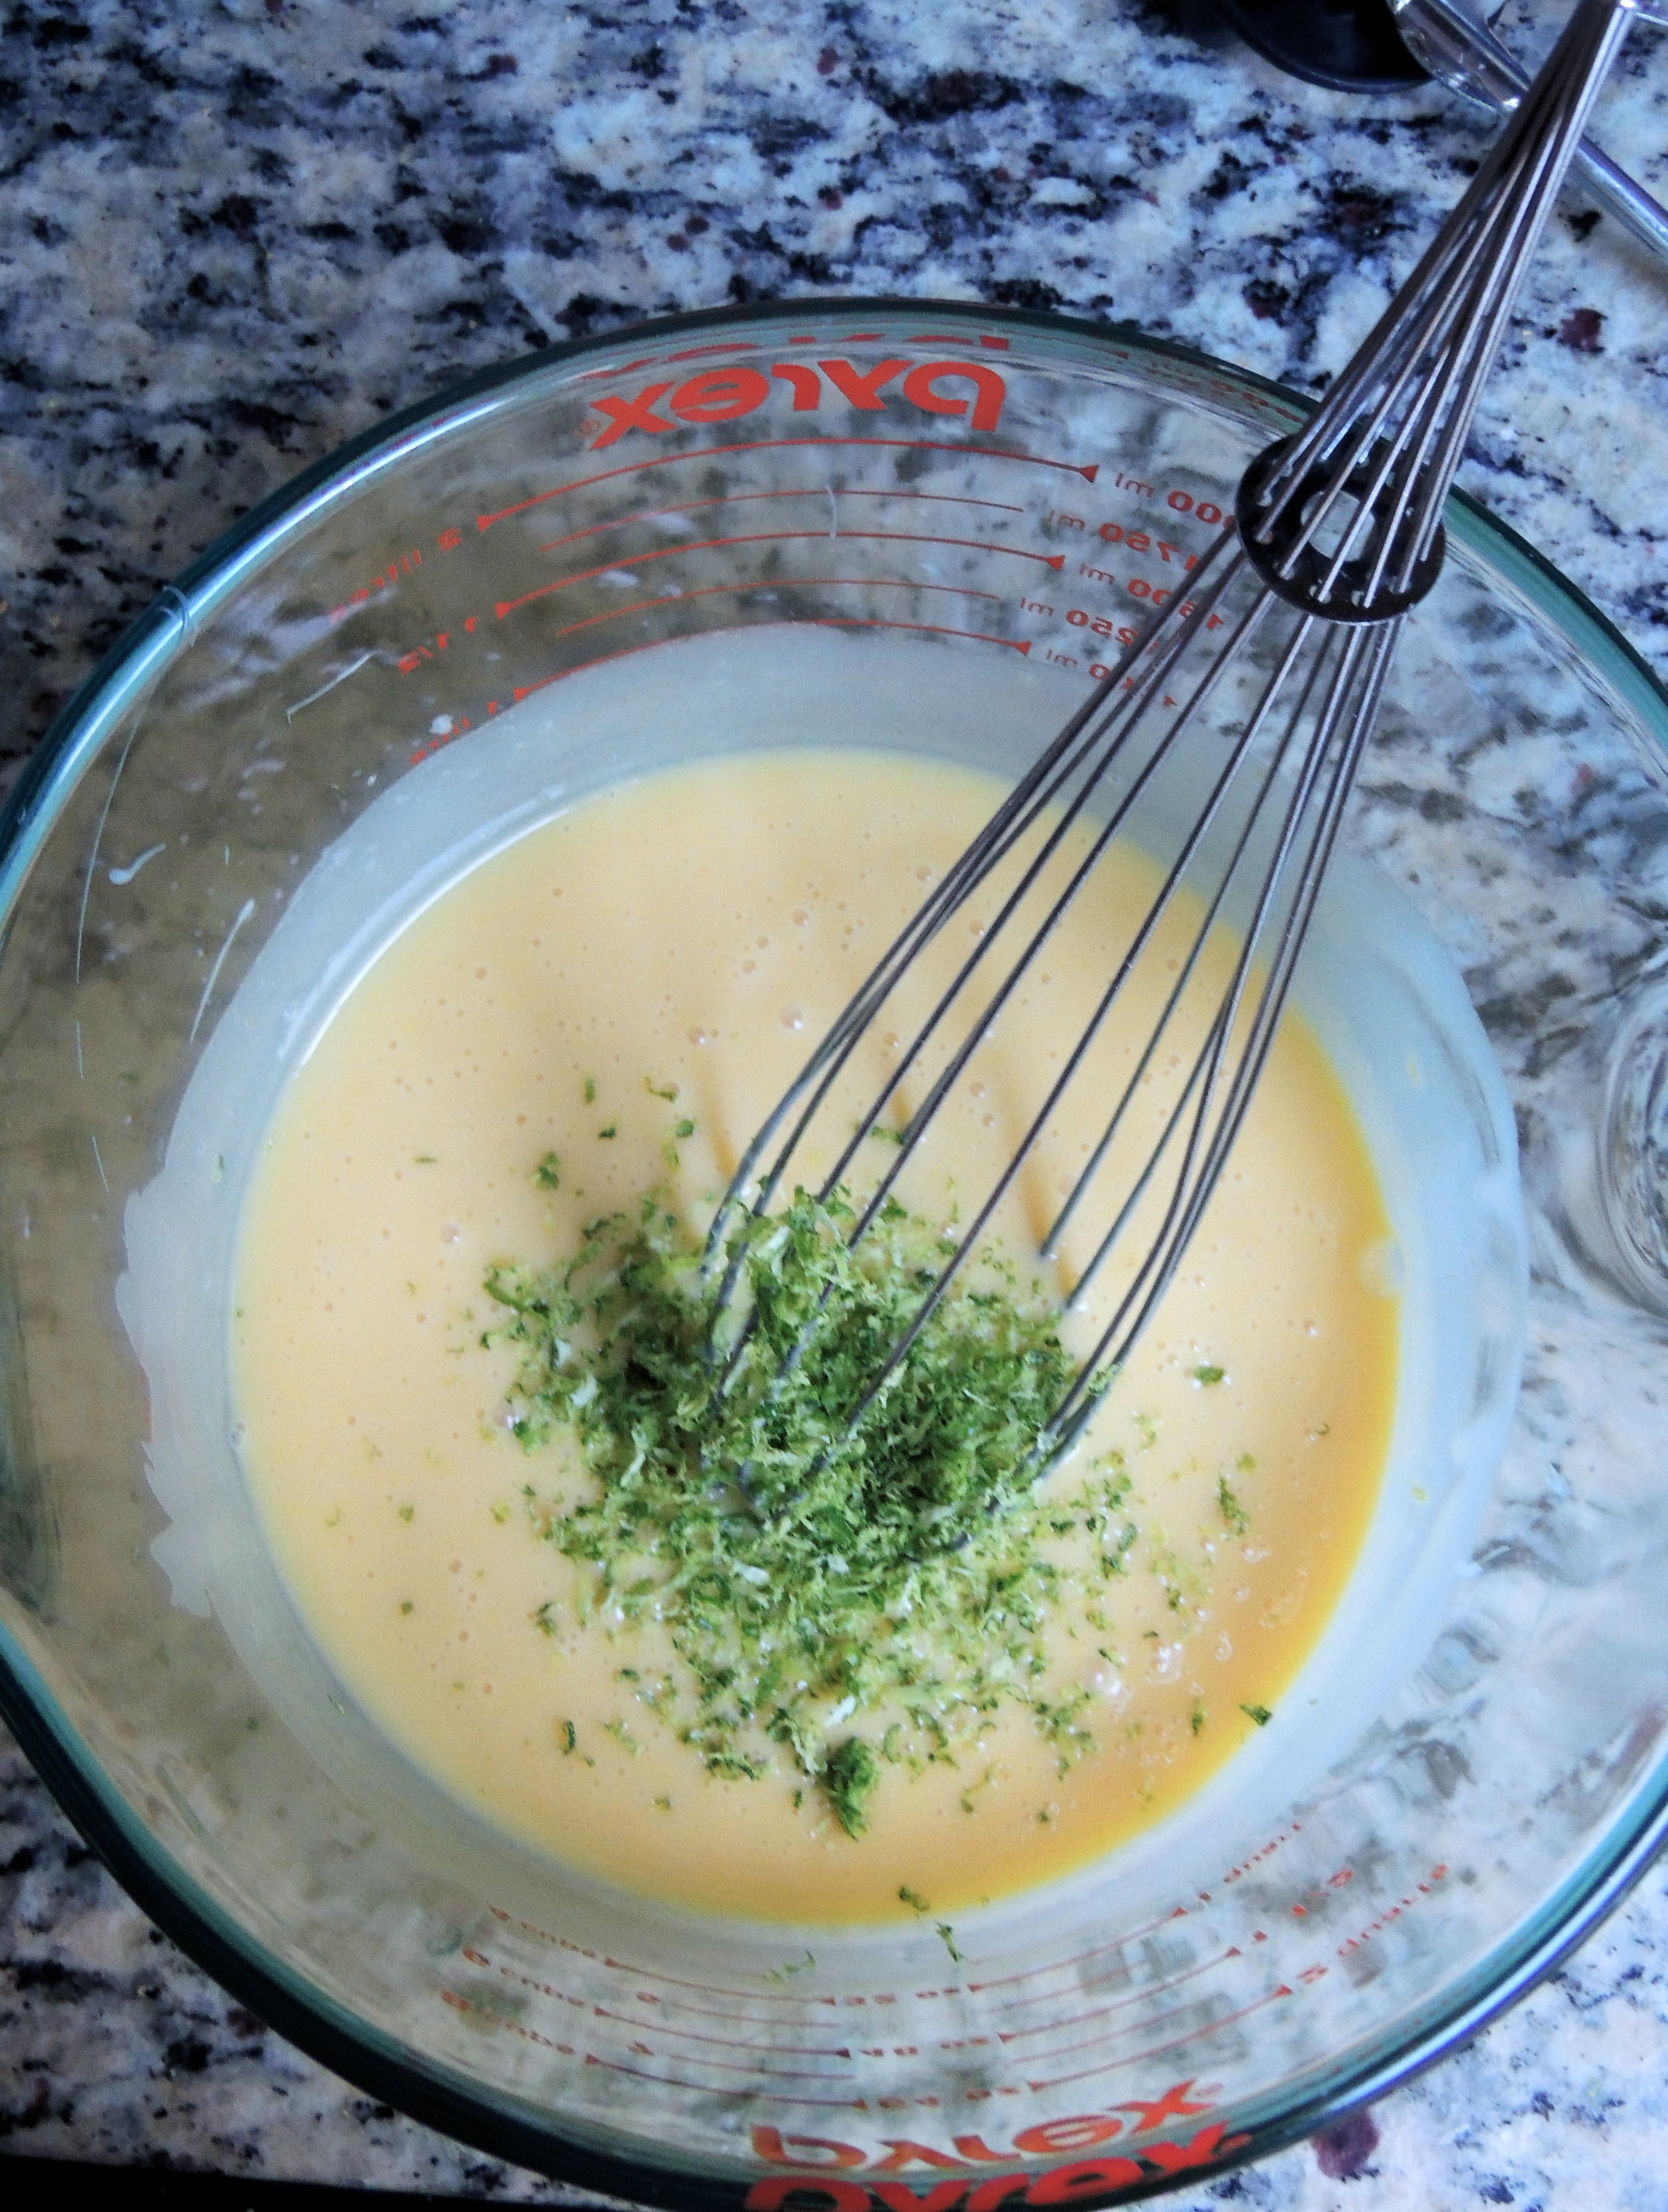
  • Two 14-ounce cans of Eagle Brand sweetened condensed milk
  • 8 egg yolks (save the whites to make a tasty meringue!)
  • 1/2 cup lime juice, freshly squeezed
  • 1/2 cup lemon juice, freshly squeezed
  • Lime zest, for garnish

DIRECTIONS 

Preheat your oven to 350 degrees F. Take out two baking sheets, set them aside.

Finely hand-crush the saltine crackers in a large bowl, but be careful not to crush them so much that they become cracker dust. Add the sugar and stir to mix. Next, add the butter and knead it in until the cracker crumbs come together like a dough. Take out your four mini pie plates, then press the dough evenly into each. (Note: You may end up with more pie dough than pie plates to press it into, and that's perfectly fine. Better to have too much than not enough when it comes to mini pies!)

Chill in the refrigerator for 15 minutes, or freeze for 10-12. Once your pies have chilled, place two on each baking sheet and bake in the oven for 18-20 minutes, or until the crusts have gotten nice and golden brown. Let them cool slightly.

While your pie crusts are cooling, it's time to make the filling. Start off by beating the egg yolks into the milk until everything is completely combined. Next, add the citrus juice. At first, the  juice may sit right on the top and make your custard look very thin and watery. It is very, VERY important that you stick with it and carefully stir it (it tends to splash all around at first) until all of your ingredients are completely combined. You'll start to see it thicken to a normal consistency again, just give it a little time.

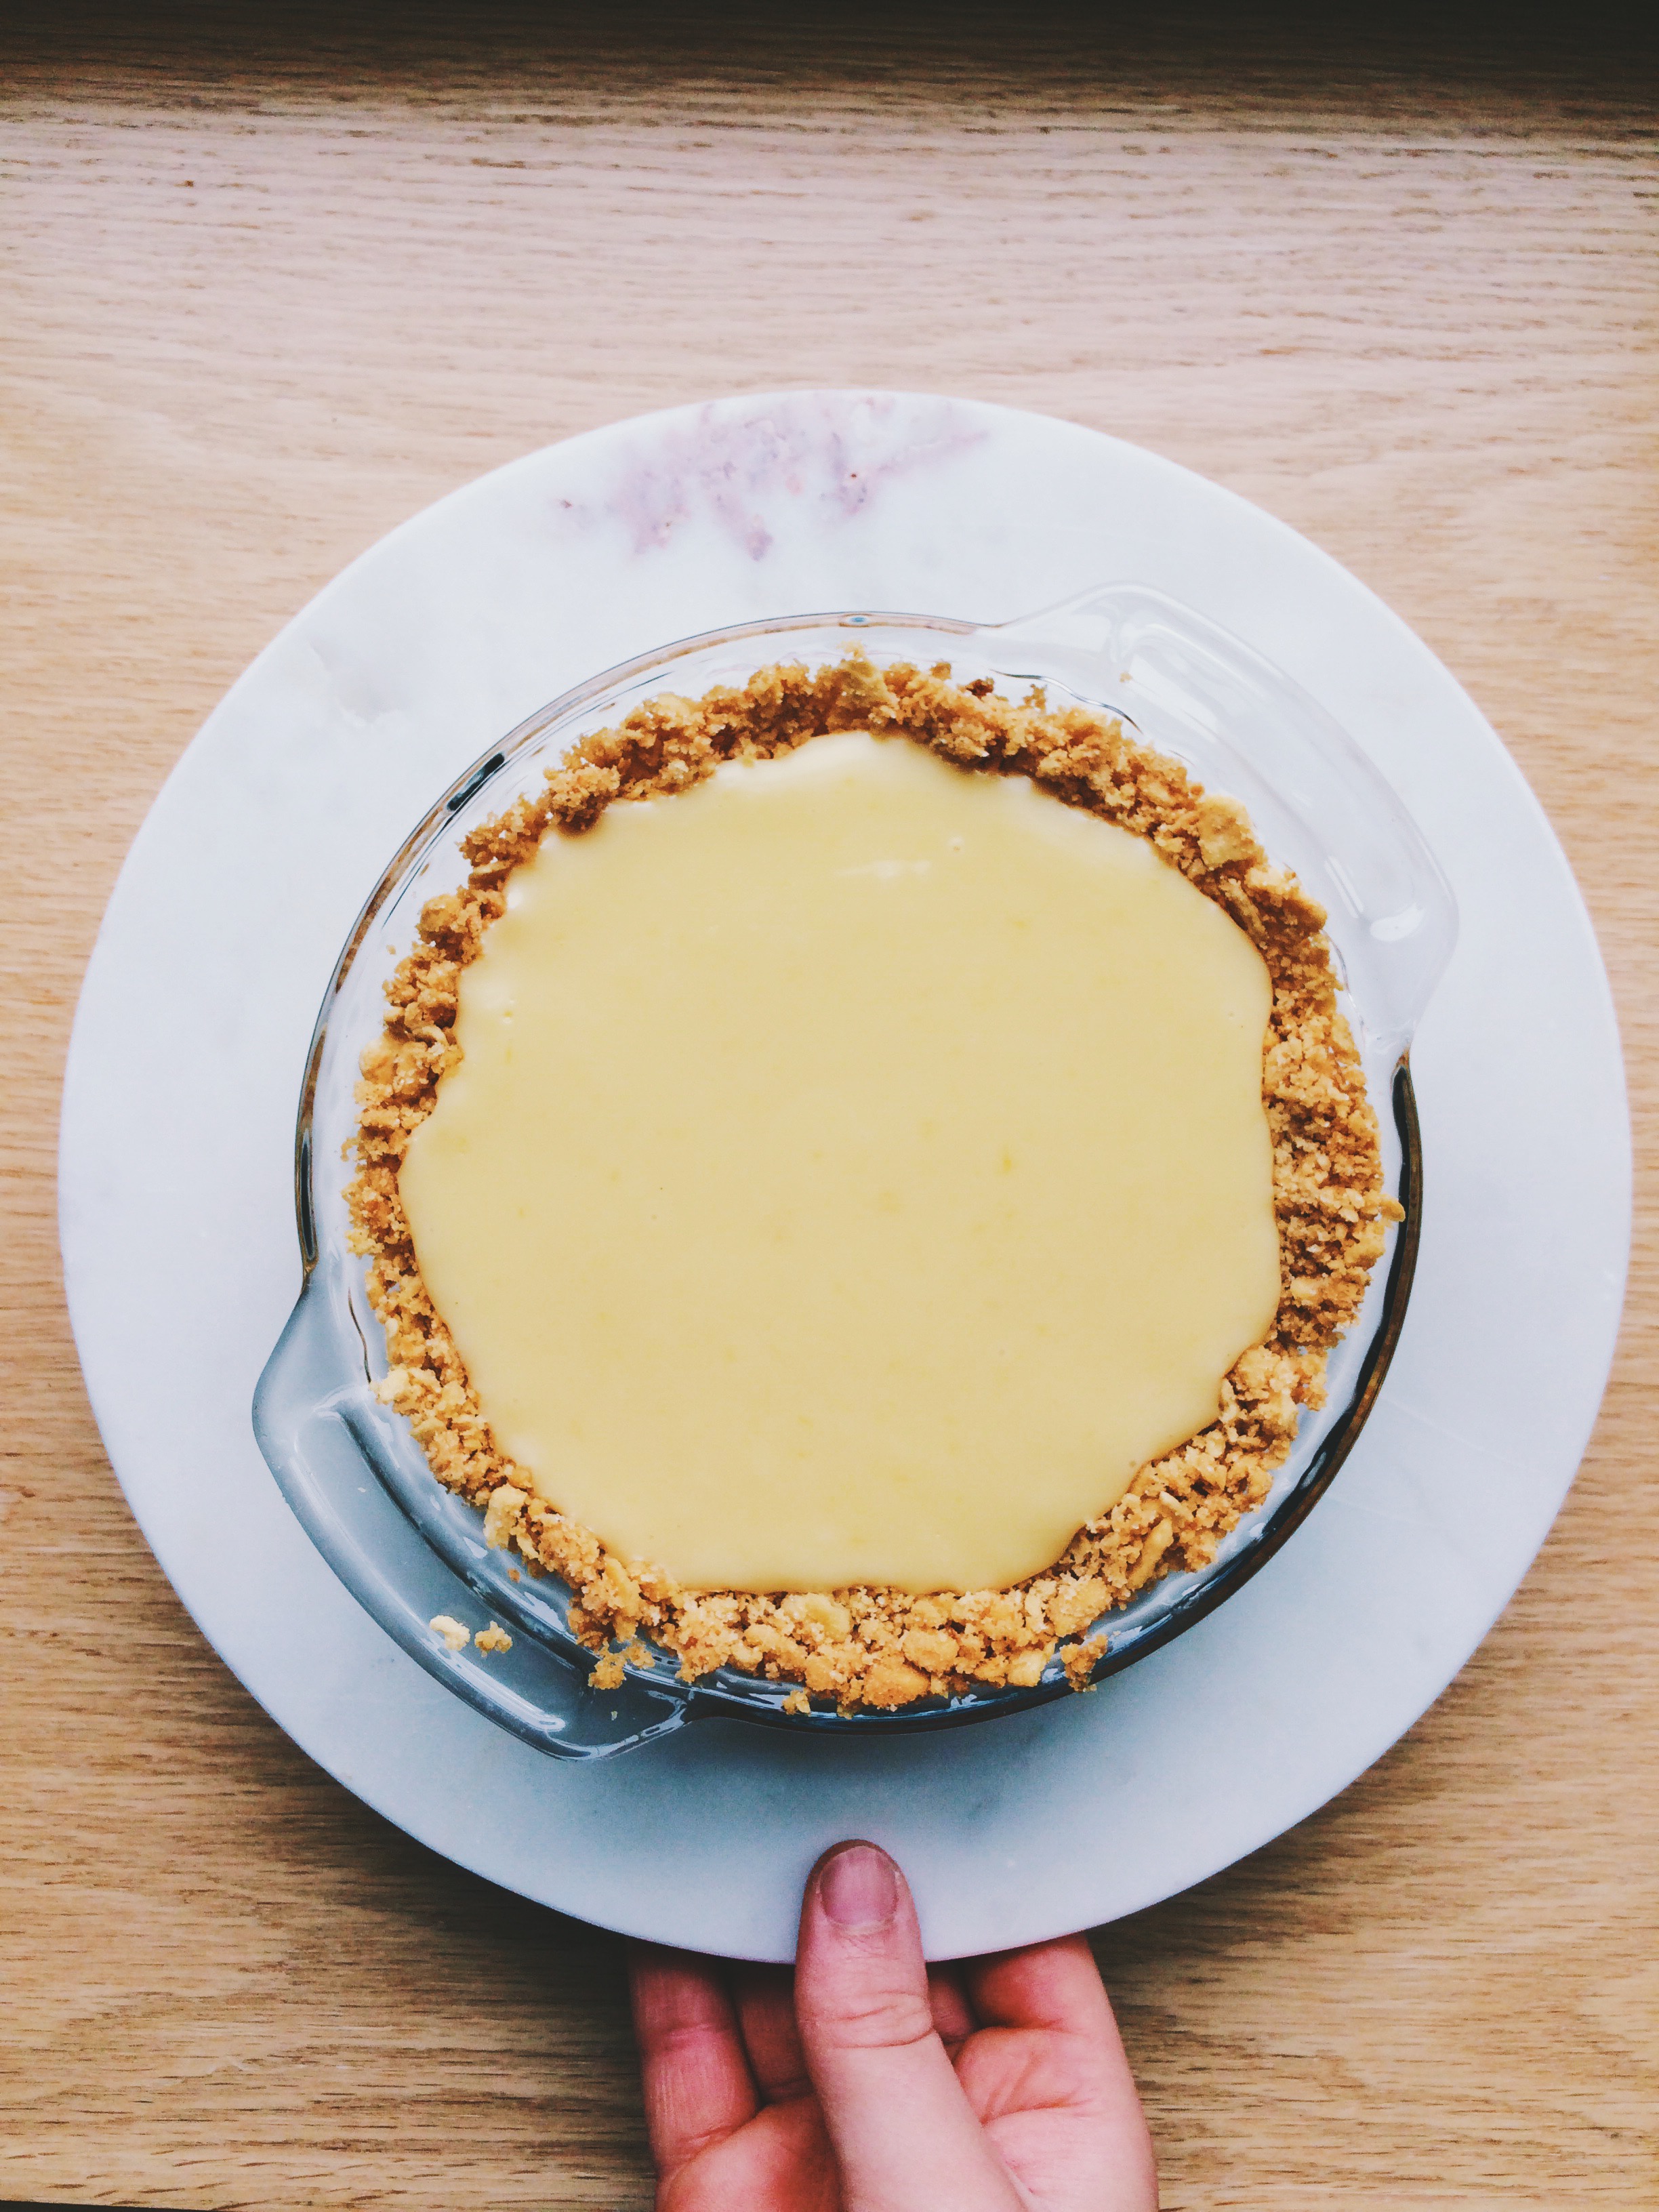
Once your custard has come together, pour it into each pie plate, making sure to avoid overfilling them. Carefully set your pie plates (if you haven't already) back on their baking sheets, then bake the pies for 16 minutes until the filling has set.

Let your pies cool on cooling racks for 15-20 minutes, then pop them into the fridge to chill completely (they must be absolutely cold in order to be sliced.)

When you're ready to serve, top each with a lovely meringue using your leftover egg whites (here's a great tutorial from The Kitchn!), or freshly whipped cream, then top with a lemon or lime wedge, citrus zest, or coarse sea salt as a garnish.


SOURCE: Adapted from Food52

Classic Chocolate Pie

There's something very special about being a Northerner with deep connections to the South: tradition. Whether you are up North or down South, there is nothing more sacred than tradition. I love that.

These days in the culinary world, it's about finding the next big innovation. It's about blowing peoples' minds with the new and the shocking. It's about re-inventing the already re-invented. Everything has to be bigger and better and larger than life. But, isn't it nice to sometimes just take a quick step back to honor the classics? Isn't it important to acknowledge the things that have lasted the test of time? I think so. I think that, along with apple pie, chocolate pie is about as classic as they come.


What I love about this chocolate pie is that it really is a classic in more than one sense of the word. It's easy, which the best pies always are. And it's just straight-up what it is: super. super chocolatey.

No fuss, no frills, just supreme fudginess and an utterly buttery, flaky pie crust. And don't forget a generous slathering of homemade whipped cream on top; that's a must-have.


CLASSIC CHOCOLATE PIE  

What You'll Need:

  • 1 Flaky Pie Crust 
  • 1 1/2 cups sugar
  • 3 tablespoons unsweetened cocoa powder
  • 4 tablespoons unsalted butter, melted
  • 2 large eggs, beaten
  • 3/4 cup evaporated milk
  • 1 teaspoon pure vanilla extract
  • 1/4 teaspoon salt
  • homemade whipped cream, for serving (optional)
  • 1 ounce dark chocolate, for shaving (optional)


Find the recipe on Food and Wine.

Happy Thanksgiving!

You guys. You guys. I've been up since before the sun came up, hunched over lightly floured services cutting holes out of dough, peeling so many apples that my fingers became prunes, and definitely accidentally licking the bitter white part of a lemon while trying to sneak some of the juice on the sly. But you know what they say: No pain, no pie...

...That's how that saying goes, right?

I'm so tired.

Despite the increase in yawning this afternoon, I'm feeling GREAT. Thanksgiving pies are FINISHED, cooling, and getting ready to be wrapped up tight for maximum Turkey Day freshness. Also, I'm one step closer to achieving my goal of being Pie Queen of the Midwest. I think I've finally, FINALLY mastered pie dough, and everything's coming up Sydney today.


I was really inspired by this video and decided to try out making a few freehand designs for my pie vents. AND I got to use some of my extra dough to make some freehand leaves! They're very easy to make, and I think it adds a little something. If nothing else, the leaves remind you that this pie is a celebration of the Harvest Season.  If you're wondering what kind of pie this is, it's the Double Apple-Pear Pie, with about 1 and 1/2 teaspoons finely chopped thyme. Adding herbs gives it some sophistication, and I'm REALLY excited to taste it. THANKSGIVING NEEDS TO GET HERE FASTER!!

I hope you have the BEST THANKSGIVING that has ever Thanksgiving'd.

It's nap time.

Gluten Free Spiced Pumpkin Pie

K, we should probably start talking about Thanksgiving now, no? And what's better to talk about when we talk about Thanksgiving, than the true table staple? Pumpkin Pie. My favorite.

There's a debate every year in which the people in my family argue the importance of double P. Some people love it, some people hate it. Maybe it's the texture? I'm not really sure. All I know is there better be a silky Pumpkin Pie with hand-whipped cream on the table on the last Thursday of every November, or someone's in trouble. And if I have to be the one to make it, then so be it. At least I'll sleep well knowing that I already have my dessert plate mapped out for maximum consumption. But lately I've been thinking about my gluten-intolerant friends: what do they do when a flaky all-butter crust (my go-to for every pie), or a sweet and buttery graham cracker crust is not an option?

Last weekend we attended a Ladies' Day event in Milwaukee which my mother helped plan, and I volunteered to bake. Everything was going great, meal-plan wise until I was informed that there were gluten allergies and thus, the desserts must be completely gluten-free. I quickly assured her that it wouldn't be a problem, but I'll be honest: I was nervous. Despite the fact that I have a best friend who is gluten-intolerant, whenever food is involved, it's usually someone else making it and I don't have to worry about it. I made her flour-less chocolate cake once (it was DIVINE), but that was it.

Would I really have to buy new flours and ingredients that I probably would never use again? Or worse, use BOXED CAKE MIX?

I shudder to think. (Hi, I'm dramatic.)

Luckily, I was flipping through the pages of the November 2015 issue of Martha Stewart Living and came across the answer to all of my problems: Gluten-Free Pumpkin Pie! I was ecstatic of course. One, because you know how much I love pie and use any excuse to make it. And two, because I could use ingredients I have on hand absolutely all the time! I ran it by the committee, was told that I would have to make three, and was sent on my way.

I may have spent seven hours in the kitchen, but there's nothing I love more than making pie.

Now, what makes this pie GF you may ask? The CRUST! Three cups of Rice Chex (naturally and wonderfully GF), butter, brown sugar, and a little salt. Pulse those together in a food processor (I have a baby one that holds 4 cups), then spread into a pie plate, and bake it for 12 minutes to set. It's SUPER EASY, and CRAZY DELICIOUS. That brown sugar caramelizes in the oven, making the crust buttery and sweet with a hint of a crunch still. And pair that with the sweet pumpkin-y custard that is the filling, plus  the homemade whipped cream that was carefully piped onto the top, and it's just perfect.

I tell ya, it was a total hit amongst the gluten-lovers and gluten-intolerant alike, for we could all stuff our faces with pie in harmony.

Make it for Thanksgiving, make it forever.


GLUTEN-FREE SPICED PUMPKIN PIE 

What You'll Need:

Pie Crust:

  • 3 cups Rice Chex
  • 5 tablespoons unsalted butter, melted
  • 5 tablespoons packed light-brown sugar
  • 1/4 teaspoon coarse salt (I used coarse kosher salt)

Spiced Pumpkin Pie:

  • 1 1/2 cups unsweetened pumpkin puree
  • 3 large eggs, room temperature
  • 3/4 cup packed light-brown sugar
  • 1 tablespoon cornstarch
  • 1/2 teaspoon coarse salt (I used coarse kosher salt)
  • 1 teaspoon ground cinnamon
  • 1/4 teaspoon grated nutmeg
  • 1 cup whole milk

DIRECTIONS

First, let's make the pie crust:

Preheat the oven to 375 degrees

Pulse together the cereal in a food processor until finely ground. Then add the melted butter, brown sugar, and salt. Pulse until well combined.

Press the crust mixture evenly into the bottom and up the sides of a 9-inch pie pan. Bake until golden brown about 12 minutes. Set on a wire rack to cool completely.

OKAY, PIE TIME!

Reduce the oven temperature to 325 degrees F.

In a large bowl, whisk together the pumpkin puree and eggs.

In a smaller bowl, stir together the sugar, cornstarch, salt, cinnamon, and nutmeg. Transfer the dry ingredients into the bowl with the pumpkin-egg mixture, and mix until well combined. Then, whisk in the milk.

Place your cooled pie pan on a rimmed baking sheet to reduce the chance of your filling spilling out on the way to the oven. CAREFULLY pour filling into the center of the crust for more even spreading. DO NOT OVERFILL. You may have some filling leftover, and that's okay! You do not want an overflow in the oven, trust me.

Transfer your pie on the baking sheet to the oven and bake until filling is just set, ABOUT 50-55 minutes, but KEEP AN EYE ON IT. If a custard-based pie (like this one) is over-baked, it will crack, and no one wants that. (But if it does crack, you can always cover it with whipped cream, so don't fret.)

Set on a wire rack to cool completely.

Once cooled, pipe or spread on some homemade whipped cream if you're into it, and transfer pie to the fridge to chill before serving.

(MAKE AHEAD: This pie can be made up to 2 days ahead of time. KEEP REFRIGERATED.)

SOURCE: Slightly adapted from Martha Stewart Living

Blackberry Cobbler

blackberry cobbler 1 Hi, we're embracing seasonality now. It was a GREAT week at the market for produce, and to celebrate, I decided to put a bunch of sugar and fruit into a bowl together, then throw it in a pan. Maybe it's a pie. Most definitely, it's a cobbler.

I'd never made cobbler before this, but I've eaten plenty. Most notably was an unbelievable peach cobbler with the most heavenly blend of spices the world has ever seen. I'm STILL trying to figure it out ten years later, and of course the excellent baker who introduced me to the best peach cobbler ever, is nowhere to be found. Inspired by this, and also still on my "variations of pie" kick, I decided to embrace the beautiful blackberries practically screaming at me to take them home, and cook them at high temperatures. So into the basket they went.

blackberry cobbler2

My favorite thing about cobblers is how unbelievably easy they are to make. Honestly, so easy. Your filling gets mixed with a few ingredients, and then you let it rest covered for 15 minutes. Then, you make a biscuit mixture using just a few ingredients. Once everything is done, and you've buttered your pan, you spoon in your filling, then  your mixture on top, pour (CAREFULLY! It spills!) a couple tablespoons of melted butter on top to give it that beautiful brown color, and you pop it in the oven. Perhaps the only complicated part of the recipe, and I mean comparatively speaking, is that you must keep up with the baking time because your cobbler will bake at two different temperatures before it's finished. The hardest part? This is pretty important: you must, and I mean you MUST let your cobbler cool completely. I know, I know, it'll be hard, but you've just got to. Your filling needs time to set, and really solidify its flavors. Letting it cool will be like the caterpillar finally emerging from its cocoon as a beautiful butterfly. The pie is a butterfly. Give it time to look and taste beautiful.

blackberrycobbler3

We must also take a brief moment to not only talk about the topping, but to really appreciate it. It's not crumbly like you may be accustomed to. It's more like a biscuit, and therefore sooo much better. If you've ever enjoyed freshly baked biscuits with a generous smearing of freshly made jam, then this cobbler is for you. It's buttery, it's flaky, it's DELICIOUS. It's soft, and SO GOOD with that sweet-but-not-too-sweet blackberry filling. It all just works. And honestly, if you ask me, this cobbler show-stopper is even better the next day.

Hey, don't you have a cobbler to make?


BLACKBERRY COBBLER

What You'll Need:

FILLING:

  • 4 1/2 half-pints of blackberries (6 ounces each)
  • 1 cup granulated sugar
  • 1/4 cup cornstarch
  • 2 tablespoons all-purpose flour
  • 1 teaspoon ground cinnamon

TOPPING

  • 1 cup all-purpose flour
  • 1 teaspoon baking powder
  • 1/4 teaspoon baking soda
  • 1/4 teaspoon fine sea salt
  • 3 tablespoons unsalted butter, cubed
  • 3/4 cup buttermilk
  • 3 tablespoons unsalted butter, melted

DIRECTIONS:

First Things First:

-Butter a 9-inch pie pan really well. Set aside

-Preheat the oven to 425 degrees F.

Okay, Now Let's Make the Filling:

-Combine the blackberries, sugar, cornstarch, flour, and ground cinnamon in a medium-sized bowl. Carefully stir together until all the dry ingredients are well-mixed, and the berries are well-coated.

-Cover with cling wrap, and let rest for 15 minutes.

That's Done. Shall We Make the Topping?

-Combine the flour, baking powder, baking soda,  and fine sea salt in a medium-sized bowl.

-Using a pastry cutter, fork, or even your hands ( I've been using my hands a lot more lately!) quickly cut the butter cubes into the mixture until it is crumbly, and you've got pieces that are pea-sixzed or smaller.

-Make a well in the center of your mixture. Slowly pour the buttermilk into the center, and use a large spoon to gently mix it all together until all the dry ingredients are just combined. Your topping will look very wet at this point, but that's just what we want.

-This is a good time to melt the extra 3 tablespoons of unsalted butter.

Now Let's Put it all Together! 

-Spoon your blackberry mixture evenly into the prepared pie pan.

-Using a large spoon, dollop about three tablespoons of the biscuit mixture into mounds all around the surface of your blackberry mixture. This doesn't have to be an exact science (Goodness knows mine did not completely turn out the same size), just make sure your mounds of biscuit topping have been evenly distributed all across the top; we want everyone to get plenty of topping on their plates!

-Carefully pour your melted butter all across the top of your biscuit topping so that you'll get a nice, even brown color when it bakes. Be EXTRA CAREFUL because that melted butter is sneaky and will slide right off of the pie and onto the countertop. It's not fun to clean up.

-Bake your pie at 425 degrees F for 15 minutes, then reduce the heat to 350 degrees F for an additional 30 minutes.

-Cool for at LEAST 1 hour, though I think the longer you let it cool and rest, the better.

Serve with either your favorite vanilla ice cream, or some delicious homemade whipped cream. ENJOY.


SOURCE: A Year of Pies: A Seasonal Tour of Home Baked Pies

Blueberry-Pecan Galette

blueberry-pecan3 My new obsession? Pies. I am SO into pies right now.  It's not even that I love eating them (though that's obviously always a bonus); it's so much more than that. When making pie dough, you're able to set aside that pastry blender, and just dig in with your hands. It's direct contact with the thing you're creating, and it just doesn't get more personal and literally hand-made than that. A fresh, flaky, all-butter pie crust is a blank canvas, and the possibilities are truly endless. The idea of filling it with ANYTHING is just so exciting to me.

I might love pie, but that, doesn't  mean that I'm particularly good at it...yet. See, that's actually the funny thing about pie: it's not as easy to make as it looks. You've got a lot working against you; butter melting in the dough because you're handling it too much. Adding too much, or even too LITTLE, water to your pie crust. Overworking the dough. UNDERworking the dough. Filling spilling over the sides while it's baking. Honestly, the possibilities of pies to make are endless, and the possibilities of things going wrong when making said pie are also, yes, endless. But you must be brave, little baker. Be brave. Don't apologize. Make your pie with confidence. And, if you're still feeling a little iffy, take a step back, and make a galette.

blueberry-pecan 1

The beauty of the galette is: the more rustic, the better. If you're just so-so at pie decoration, you've got nothing to worry about. All you need is your favorite fruit filling, a little heavy cream, some sugar to sprinkle, and some expert edge-folding abilities. That's it. You just roll out your crust, pop it on your baking sheet, add your filling, brush on your heavy cream to give it that deep, beautiful browned crust, sprinkle a little sugar, and pop it in the oven. It's the perfect anytime almost-pie.

Now, you could go with a classic all-butter crust, but why do that when you can make things a little more interesting with pecan? Toasting whole pecans in the oven for 15 minutes before crushing them brings an extra level of flavor, and gives the crust a little texture that pairs well with the softness of the blueberries when baked. Pair this galette with a scoop of your favorite vanilla bean ice cream, or some homemade whipped cream (I put mine in the freezer!) and totally go to town.

So, we've done sweet. What do you say we try a savory galette next time?

blueberry-pecan4


BLUEBERRY-PECAN GALETTE

What You'll Need:

  • 1/2 cup pecans
  • 1 cup plus 2 tablespoons all-purpose flour
  • 2 teaspoons sugar
  • 1/2 teaspoon kosher salt
  • 1/4 teaspoon ground cinnamon
  • 1/2 cup (1 stick) chilled unsalted butter, cut into cubes
  • 12 ounces blueberries (about 2 cups)
  • 1 tablespoon cornstarch
  • 1 1/2 teaspoons lemon juice
  • 1/4 cup sugar, plus more for sprinkling
  • 2 tablespoons milk or heavy cream

Find the recipe on Bon Appetit!

Maple-Bourbon Pecan Pie

pecan pie 2 My dad's birthday was Sunday, and birthday cakes just don't fly with him. He'll eat them, but he never request them. Instead, you better be pulling out that pecan pie recipe. (Side note: how do you pronounce "pecan"?  In the Midwest, it's pronounced "pe-cahn." In the South, it's "pee-can" or else. I generally go with the latter, despite my upbringing.)

But ugh, pecan pies can be so boring if you're not careful, and making the same things over and over again can drive a girl crazy. But, it was his birthday, and on his birthday, things have to stay the same...with a few amped up modifications, of course!

pecan pie 1

Enter: bourbon. I love baking with bourbon. I don't like drinking it, but I LOVE the taste of it. It adds a richness, and a bit of sweet vanilla-smokiness that always takes things to the next level. Have you ever tried making vanilla extract with bourbon? Or how about bourbon caramels? I have to tell you, I can never make either any other way again.

pecan pie 3

Not only is bourbon a key component to this new pie, but there's also the addition of a little maple syrup. It's not a large amount, and it definitely doesn't stand out quite as boldly as the bourbon, but it has a very special place: it helps add more depth, and more complexity. Maple syrup is quite subtly-smoky, and so rich. When you add that subtle hint of smokiness, and mix it with the vanilla and oak notes that the bourbon brings, you've got a very flavorful partnership.

This whole pie works. IT JUST WORKS. The pie crust is flaky and soooo buttery, the pecans are crisp, and add that satisfying crunch, and that maple-bourbon combination? Just out of this world. Dad loved it (perhaps more than the traditional?), and was throughly sad to see an empty pie plate once again, a mere three days later. We were all sad to see it go, really.

pecan pie 4


So, OK, it's time to come clean: this pie was an experiment. I knew maple and bourbon would get along famously with the rest of the ingredients, but I was a bit nervous about the measurement modifications. When the expectation after dinner is to be served a slice of something you've grown to love just the way it is, deviations can be tricky. Perhaps this recipe was the real deal, or perhaps I got real  lucky. Either way, it'll take a few more test drives in the ol' test kitchen before it finds itself on DD. 

BUT, I'd never leave you hanging.. Here are some excellent recipes to try in the meantime:

Martha Stewart's Maple Bourbon Pecan Pie 

This simple Bourbon Pecan Pie (with an option to add a teaspoon or two of maple syrup) from Garden and Gun Magazine

OR how about this one from Epicurious?


Whichever you choose, know that I'll be right there next to you in spirit, with a fork in my hand ready to dig in.


Apple Spice Hand Pies

apple hand pies 1 Do you ever wonder, after making something new, how you could have lived without it before? That's how I feel about hand pies. Sure, I've bookmarked dozens of recipes in the never-ending black hole that is my "Recipes" folder, and I've even eaten them, but never had I realized how much I love hand pies, until I had twelve perfectly golden ones cooling on my wire rack. I should say though, that they weren't all for me. Last weekend one of my chums, who's been telling me about Penzey's for months now, decided to surprise me with a cute little jar filled to the brim with a rather hard to find ingredient: apple pie spice! It was a lovely gift, and to repay them, I decided that the best thing to do was make some apple spice hand pies. It was the best idea for all parties involved, really. apple hand pie 2Pies are not my strong suit; let's just throw all the cards on the table now. I once tried to make a savory cheddar and garlic pie with an apple cider vinegar crust, and everything was going pretty well, until I tried pouring the filling into the crust only to discover that I'd rolled the pie crust too thinly, and custardy filling was going everywhere. There was a lot of mopping up of counters and floors, but in the end, what was left was delicious. Will I make it again? Probably not. I dunno, it was pretty good. Never say never. ANYWAY, based on my so-so pie track record, making hand pies for the first time made me a little nervous. I had a limited amount of apples and butter, a pie crust that was a little crumbly when I had made it the night before, and I was missing the necessary 5 1/2 inch cookie cutter that the recipe called for. There was only one shot to get this right, and I was determined to show up the next day with pies in hand. Even if I could just get two, that would be enough. Turns out, I had nothing to worry about! Everything went off without a hitch after I got a little creative with the cookie cutter. Instead of one that is 5 1/2 inches (which is really hard to come by unless you're ready to order it online and wait), I was lucky enough to find an oversized coffee mug that was about 4 1/2 inches. Good enough! I floured the rim, pressed down and carefully wriggled each piece free. Easy. The trick to a good hand pie is finding the perfect balance between filling and pastry. Too little, and you're eating a lot of shell with the occasional bite of filling. Too much, and you're looking at a baking sheet with filling cooking exactly where you don't want it to be: on the outside. Either way, you'll end up with a very empty shell. The key is to put the filling right in the center, leaving room on both sides for folding over and crimping the edges. By adding the filling to the center, you're able to control the amount that goes on with each spoonful. If you feel like you need a little more, you're free to do so. It's much easier to add more than to *attempt* to take some out. And do yourself a favor: use a slotted spoon to scoop out your apple filling from the pan. The last thing you want is extra moisture, TRUST ME. What a mess. If you're wondering which apples to use, I used a mix of Gala and Lady Alice apples. Both worked really nicely. These apple spice hand pies are the buttery and spiced mini pies of your dreams.

What You'll Need:

For the Pie Pastry:

  • 3 cups all-purpose flour
  • 1/4 cup sugar
  • 1-1/2 tsp fine sea salt
  • 2-1/2 sticks (1-1/2 cups) unsalted butter, very cold, cubed
  • 1/3 cup all-vegetable shortening, very cold or frozen, cut into small pieces
  • 6-7 tbsp ice water

For the Apple Filling:

  • 5 cups apples, peeled, cored and diced (about 5 medium apples)
  • 2 tbsp unsalted butter
  • 1/2 cup (packed) brown sugar
  • 1 tsp ground cinnamon
  • 1/4 tsp ground nutmeg
  • 1/4 tsp ground cloves

OR

  • 2 tsp apple pie spice

For Brushing on Top:

  • 1/3-1/2 cup heavy whipping cream
  • Turbinado or Demerara Sugar for sprinkling

TO STORE: Carefully wrap in cling film and keep in a cool place. They taste great when popped back into the oven at a low temperature for 10-20 minutes. Find the recipe on Fork Knife Swoon!

French Silk Pie

photo-10 Happy Valentine's Day! I love love, and I love chocolate, so let's dive right in.

Ever since my visit to Chicago's Bang Bang Pie, I have been obsessed with french silk pie. I've been told it's a classic diner pie , but this girl has been to her fair share of diners, and no french silk in sight! It's just as well; the first time you have french silk pie has to be a straight up experience, not just another dessert.

People are always likening the things they really, really like to Heaven. You know what I mean? "That massage I just got? HEAVEN." "That shoe place is like HEAVEN." "Those dogs kisses on my mouth? HEAVENNN." It's become so overused. But let me tell you something right now: the only thing better than this pie once it's completely chilled and set, is the actual moment of euphoria that is finding extra filling in the mixing bowl once the pie shell has been filled. That unset, chocolate mousse filling is actual Heaven on Earth. It's silky (hence the name!), chocolaty beyond belief, creamy, and lighter than air. It's silky, chocolaty, creamy air on a spoon. I will not tell you how much of it I ate before I could finally snap myself out of it to transfer the pie to the fridge before there was nothing left but crumbs in a disposable tin. If it wasn't already destined to be dessert at a Valentine's Day party, this french silk pie, along with its identical twin pie brother, would've been gone SO FAST with no regrets.

Alas, they were promised for many other tummies besides mine, so I had to let them go.

There better be leftovers.


What You'll Need:

For the Crust: 60 Vanilla wafers, finely crushed 1/4 teaspoon cinnamon 3/4 cup (1 1/2 sticks) unsalted butter, melted and cooled For the Filling: 3/4 cup superfine sugar 2 large eggs, lightly beaten 2 1/2 ounces bittersweet chocolate, melted 1/2 cup (1 stick) unsalted butter, softened 1 1/4 cup heavy whipping cream 2 teaspoons vanilla extract

Preheat the oven to 350 degrees F

To make the crust: Place your freshly crushed vanilla wafers, cinnamon, and melted butter into a medium sized mixing bowl, and stir together until all ingredients are completely combined.

Pour your mixture into a 9 inch pie plate and press the bottom and sides to create an even layer. You may end up with a little extra once you're finished.

Bake your crust for 10-15 minutes until it's golden brown. Once removed from the oven, set it on a cooling rack to cool completely, then place in the refrigerator until you need it.

To make the filling: Place eggs and sugar in a medium saucepan, continuously whisking together on medium-low heat. You'll know that your mixture is ready when it is thick enough to coat the back of a spoon. This should take 5-7 minutes. While your mixture is cooking, melt the chocolate.

Stir your melted chocolate into the mixture, and continue to stir until it's smooth. Remove from heat, and let it completely cool.

In a stand mixer fitted with the paddle attachment (or in a bowl with a hand mixer, or with a wooden spoon), beat your butter until it is light and fluffy. Add your cooled chocolate mixture, and continue to mix until everything is fully combined. Make sure to scrape down the sides of the bowl occasionally.

In a separate bowl, beat together your heavy cream and vanilla extract until stiff peaks form. Fold your newly whipped cream into your chocolate mixture and mix until it's light and fluffy. (I've found that it's sometimes necessary to help the process by mixing it with a rubber spatula for a few seconds to make sure all of the chocolate is incorporated.)

Remove your chilled crust from the refrigerator, and fill with chocolate filling. (You may end up with some extra filling at the end. I find it best to eat with a spoon). Refrigerate for 4-6 hours (or overnight). Once ready to serve, top with some homemade whipped cream, and enjoy!

SOURCE: Spoon Fork Bacon


Forks up! Everybody have some pie.

Time for Key Lime (Pie)

This is late. This is CRAZY late. But better late than never, right? RIGHT!? DSCN0634

For my work chum's birthday I've been saying for months that I would make him a key lime pie, because he will eat anything citrusy. So I finally did.

DSCN0631

Graham cracker crusts are the easiest crusts to make in the whole wide world.  A little butter, some sugar, a little baking, and you're in business.

DSCN0637 DSCN0643

And making the filling is even easier! Like shockingly easy. Like I thought I had done something wrong, it was so easy. And what I like about the recipe I found is, you use every part of the lime. Fresh lime juice. Check. Lemon zest. Extra check. It gave it more of kick, and I think my chums really liked it.

photo


Graham Cracker Crust

1 1/4 cups graham cracker crumbs 3 tablespoons sugar 5 tablespoons unsalted butter, melted

Key Lime Filling

1 (14-ounce) can sweetened condensed milk 4 large egg yolks Zest of 1 large lime 1/2 cup lime juice, from 5 limes

 Preheat the oven to 350 degrees F. In a medium bowl, stir together the graham cracker crumbs, sugar, and melted butter with a fork. Mix until graham cracker crumbs are moist. Press mixture into a 9 inch pie plate or dish. Pat down the bottom and sides. Bake for 12 minutes or until golden brown.

While the crust is baking, prepare filling. In a medium bowl, whisk together the sweetened condensed milk and egg yolks. Whisk until well combined. Add in the lime zest, and lime juice. Whisk well. Set mixture aside. It will thicken up as it sits.

When the pie crust has cooled to slightly warm or room temperature, pour the lime filling over the pie crust. Bake for 15-17 minutes. Remove from oven and cool on a cooling rack. When cool, chill the pie in the refrigerator. The filling will set up as it cools. Chill for at least one hour before serving.

Serve cold.


SOURCE: Two Peas and Their Pod


Happy Friday!

singature gray