Chocolate Chai Truffles

Recipe: Chai Spice Truffles - Seasoned with Sydney blog

I’m not that into Valentine’s Day, and I can’t decide if it’s because there’s just way too much pressure to not be single, or because I’ve never had a particularly good one. The worst Valentine’s Day, by far, was the spring semester of my sophomore year of college when a guy I’d been seeing for a while decided for the both of us that we were going to bypass the holiday altogether; it was just going to be a regular Tuesday. The only problem with that? He forgot to fill me in on it. So there I was the night before, burning a CD filled with happy songs (a few of them my own), and carefully cutting out a homemade card with a track listing on the back. We hadn’t been dating that long, so I knew to avoid the “L” word at all costs, but I thought a nice little gift would let him know that he was appreciated.

Since our colleges were within walking distance of each other, we had plenty of opportunities to spend time together. Twice a week, we had a standing coffee date at a new shop right downtown, and as luck would have it, that fateful V-Day happened to fall on one of them. I couldn’t wait to see him, and even got my hopes up that maybe, even though we hadn’t talked about how we were going to handle the holiday, he’d surprise me, too. And boy, was I surprised. The look on this guy’s face when I gave him the card and CD would make anyone beg the floor to open up wide and swallow them whole. “I…didn’t think we were doing anything special today,” he said, with a voice filled with gentle caution generally reserved for calming spooked horses. “I’m sorry, I didn’t get you anything.” And because we were freshly an item, I tried with all my might to brush off my utter embarrassment, and act like his gift was just one of MANY I was handing out that day, and that the playlist HADN”T taken me a full hour to curate because I wanted to get the flow just right. I think I mumbled something about how it was totally fine, then tried to finish my piping-hot coffee as quickly as possible without completely eviscerating my taste buds.

So did this incident sour Valentine’s Day for me forever? Not really. I don’t blame him for what happened - we were brand new, young, and in the end, not emotionally mature enough to properly communicate. And in case you’re wondering whatever happened to our dear friend, the Valentine’s Day Dodger, I heard he got married a few years ago and had a kid. So all’s well that ends well.

At any rate, Valentine’s Day isn’t all bad. The new movies and books that come out around this time are usually heartwarming, and It’s one of the biggest days of the year to celebrate everything sweet. I can’t think of anything sweeter than making homemade Chocolate Chai Truffles.

Recipe: Homemade Chai Spice Truffles - Seasoned with Sydney blog

Making truffles might seem intimidating at first. For quite some time, I believed that it took a certain amount of mastery before you could even attempt such a delicious and professional-looking act of confectionery, but it’s just not true! When it all boils down, chocolate truffles consist of just two things: heavy cream, and pure chocolate. Put those two together in the correct ratio, give your mixture plenty of time to set, and you’ve got yourself the perfect, chocolate-y canvas for whatever decorations your heart desires. And while simple chocolate truffles are amazing on their own, why not take it up a notch? I love chocolate, and I love chai, so let’s put them together!

Recipe: Homemade Chai Spice Truffles - Seasoned with Sydney blog

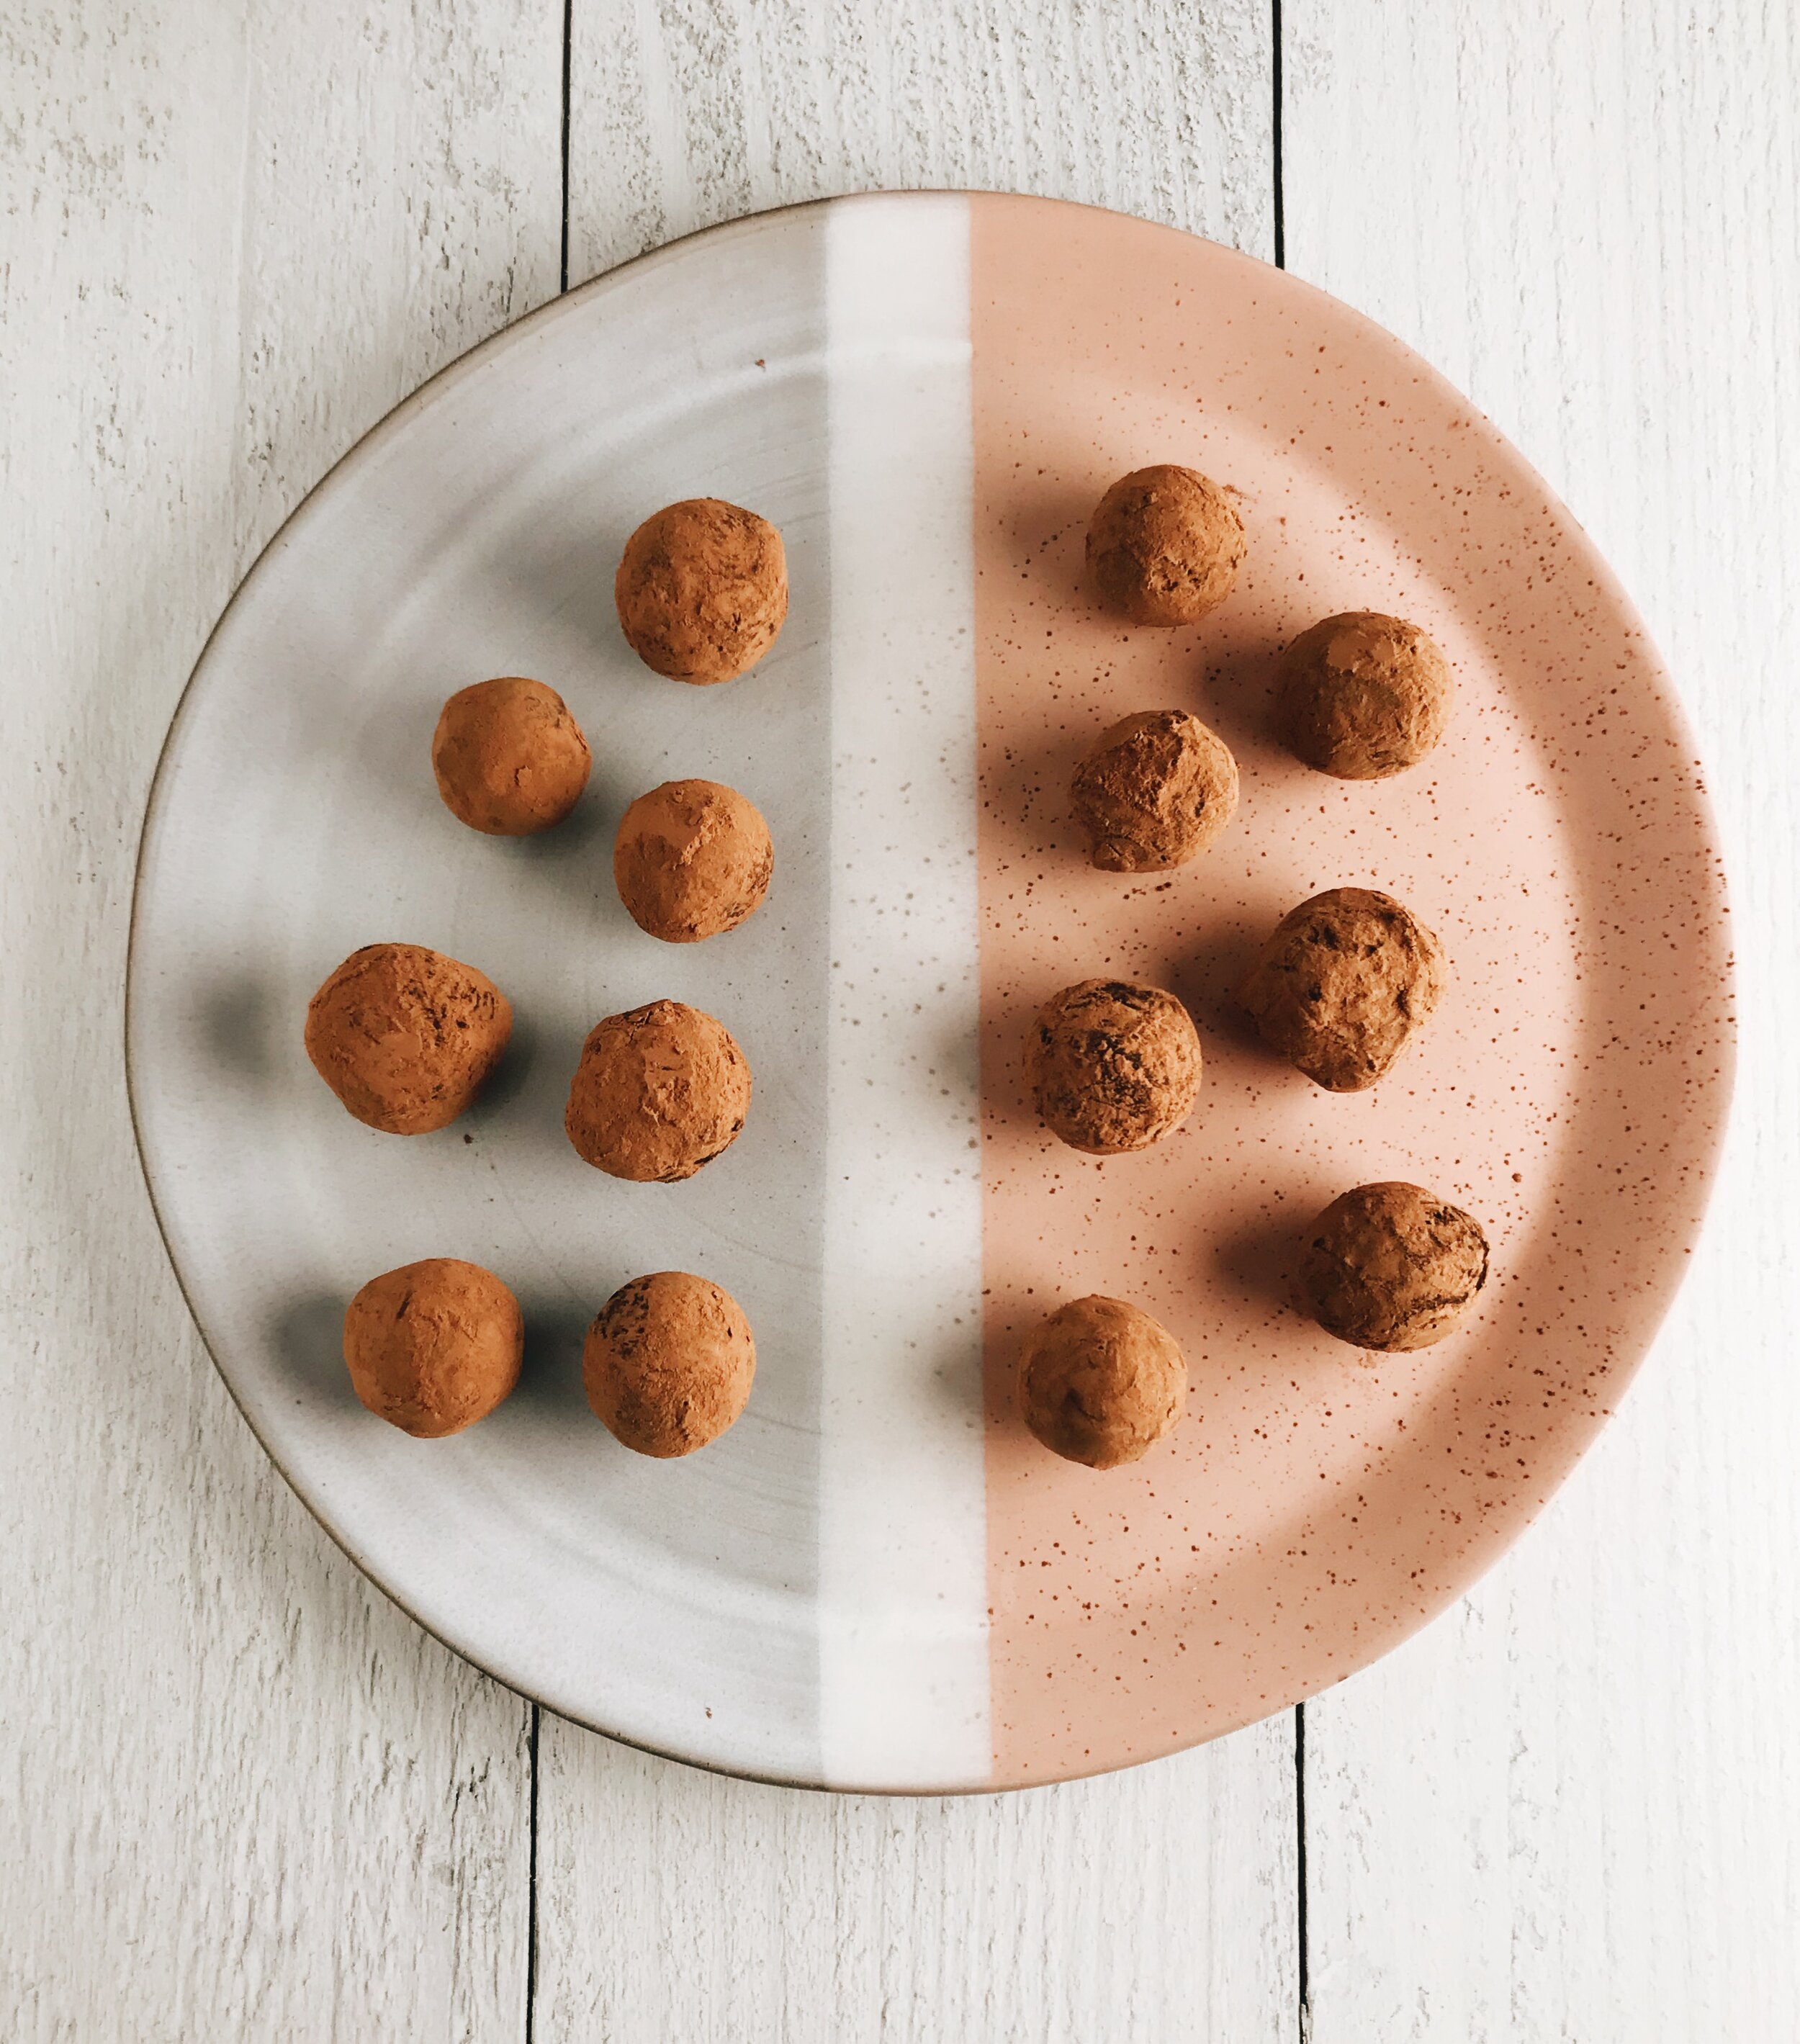
These Chocolate Chai Truffles are by far some of my favorite things to make. They’re incredibly chocolate-forward with floral, spicy notes of star anise, black tea, cardamom, and cinnamon, finished beautifully with just a hint of sea salt. These feel perfectly weighted in the hand, but aren’t so solid that when you bite into them, you break your teeth. Quite the opposite actually! Each bite melts in the mouth into nothing but decadent creaminess, making it totally impossible to have just one.

Whether you’re celebrating Valentine’s Day with a long-term partner, a virtual Zoom date, or just yourself, these Chocolate Chai Truffles guarantee that the day will be nothing but sweet (and a little pleasantly spicy)!

Chocolate Chai Truffles

What You’ll Need:

  • 8 oz (two 4 oz bars, NOT chocolate chips) semi-sweet chocolate, finely chopped

  • 10 cardamom pods

  • 5 whole star anise pieces

  • 2 cinnamon sticks

  • 5 chai tea bags

  • 2/3 cup heavy cream

  • 1/4 teaspoon fine sea salt

  • 1/2 cup unsweetened coca powder

Directions:

Place the chocolate in a medium, heatproof bowl. Set aside.

Using a mortar and pestle, or the side of a knife, gently crush the cardamom pods. Place the cardamom pods, star anise, cinnamon sticks, and heavy cream in a small saucepan. Set the saucepan over medium-low heat, and bring the cream to a simmer (be careful not to burn the cream).

Take the saucepan off the heat, add the tea bags, then cover the saucepan and let it sit for 10 minutes.

Remove the tea bags, then place the saucepan over medium-low heat again and bring the cream back up to a simmer. Remove from heat and strain the cream into the bowl with the chocolate. Discard the spices.

Let the cream and chocolate sit in the bowl for three minutes until the chocolate has softened, then slowly begin to whisk the chocolate and cream together, starting in the center and working your way to the edges of the bowl. Whisk until completely smooth. Add the sea salt, then whisk to combine. You’ve just made ganache!

Place a sheet of plastic wrap directly on top of the ganache, making sure no air can come through, then chill the ganache in the refrigerator for 2-3 hours until it has set.

Just before you’re ready to roll your truffles, place a piece of parchment paper on a cookie sheet and set aside. Next, fill a small bowl with the unsweetened cocoa powder.

Remove the plastic wrap from on top of your ganache and discard. Using a melon baller the size of a teaspoon, a teaspoon cookie scoop, or an actual teaspoon measuring spoon, roll two teaspoons of the ganache at a time, then mold, shape, and roll them together until you have a smooth truffle. Roll the truffle in the coca powder, then place on the cookie sheet. Repeat this process until you have run out of ganache. You should have about 20 truffles at the end.

Transfer the cookie sheet to the refrigerator and let the truffles set for at least 1 hour.

TO STORE: Truffles can be kept in an airtight storage container in the refrigerator for one week.

Homemade Dinner Rolls

recipe: Homemade Dinner Rolls - Seasoned with Sydney blog

Some things about Thanksgiving are going to be different this year. Usually, for the cold-weather holidays, my family heads down south to see our relatives, watch football, play Spades (I don’t personally know how to play, but the temporary drama that ensues between my extended family could rival any Real Housewives franchise), and eat our weight in cornbread and stuffing, But this year, my immediate family is staying home and celebrating everything we’re grateful for by having a micro-Thanksgiving. We’re still planning to eat all the foods we’re used to (in smaller quantities), and a well-coordinated Zoom call is scheduled so that we can pretend to all be at the same table, but I’d be lying if I said I won’t miss fully participating in our traditions.

Yes, some things will certainly be different, but one thing that will never change? The battle between my mother and myself for control of the dinner menu.

Every year since I was in my early twenties, my mother and I have duked it out over who would make what come Thanksgiving Day. The turkey, macaroni and cheese, pies, and stuffing are all up for discussion as we’ve tried every year to lessen the load for my elderly grandmother who plays host. Even though we’re in New England this year, we’ve managed to keep the spirit of that particular tradition alive and well. And in keeping with tradition, I have once again lost. (So long, Thanksgiving turkey. I hope to learn how to cook you by myself one day...) But I didn’t totally concede! While everything else was claimed before I could get my hands on the shopping list, I DID manage to negotiate making one thing for the table. I usually call dibs on dessert since baking is in my wheelhouse, but it was the first item on the menu to be finalized. So, I chose the second most important thing: dinner rolls.

Hear me out for a sec. The turkey, all golden and crispy, is the showstopper for obvious reasons. The greens, macaroni and cheese, and stuffing all have their rightful places on the plate because they’re classics (and, if you cook them like my family does, filled with enough butter to make your heart stop), but the rolls? They’re the silent supporters who keep the meal in check. Good for eating quickly as you wait in line to fill your plate or for mopping up the remnants of leftover food, the dinner roll can do anything. Humble though the roll may be when placed next to perfectly-toasted marshmallows atop sweet potatoes, without it there, you’d notice. And yes, you could buy some already made, but with just a few ingredients you can make your own, and believe me, it’s worth it.

recipe: dinner rolls thanksgiving seasoned with sydney blog homemade

The perfect dinner rolls are pillowy soft, buttery (but not overwhelmingly so - gotta make sure you can add extra butter for yourself), golden brown, and deliciously yeasty. These homemade dinner rolls, based on the world-famous Parker House rolls, check all the boxes. Add a little flaky sea salt on top and you’ve taken a classic and made it extra fancy!

Homemade Dinner Rolls

What You’ll Need:

  • 1 envelope active dry yeast

  • 1/4 cup water, warmed to 110 degrees Fahrenheit

  • 1 cup whole milk

  • 1/2 cup unsalted butter, softened at room temperature and divided into two 1/4 cup halves

  • 3 tablespoons sugar

  • 1 1/2 teaspoons fine kosher salt

  • 1 large egg at room temperature

  • 3 1/2 cups all-purpose flour, plus more for dusting your work surface

  • Vegetable oil

  • 3 tablespoons unsalted butter, melted

Directions:

Whisk yeast and warm water in a small bowl and let stand for 5 minutes until the yeast has dissolved and bubbles have formed on the top.

Heat the milk in a small saucepan over medium-low heat until it has just warmed through, about 2 minutes.

In a large bowl, mix together 1/4 cup butter, sugar, and kosher salt. Next, add the warm milk and whisk until the ingredients are fully blended (the mixture may look curdled at this stage if the butter has not completely melted - that’s okay, just keep going!). Add the flour all at once and stir continuously with a wooden spoon until a dough forms. Lightly flour your hands and a clean work surface. Turn the dough out onto the surface and knead until the dough has become smooth and pliable, about 5-6 minutes (if the dough is too sticky, feel free to add more flour to the surface a little bit at a time until it becomes easier to work with - careful not to add too much!)

Lightly oil a large bowl with the vegetable oil and transfer the dough into it, turning the dough over once to make sure it is covered on both sides. Loosely cover the bowl with plastic wrap and let rest and rise at room temperature until it has doubled in size, about 90 minutes.

Preheat the oven to 350 degrees Fahrenheit and adjust the oven rack to the center of the oven. Melt 1/4 cup butter in a small saucepan then, using a pastry brush, brush some butter into a 9x13 -inch baking dish. Set the remaining butter aside for a moment.

Punch down the dough (it should’ve risen quite a bit at this point!), and transfer it back onto a lightly-floured, clean workspace. With floured hands, carefully shape the dough into a 12-inch log. Using a sharp knife or bench cutter, carefully cut the log into 18 pieces that are roughly the same size. Next, cut each piece in half so that you end up with 36 pieces in total. Roll each piece into the shape of a ball.

Working one at a time, roll each ball out into a 3-inch oval using a floured rolling pin. Brush the interior with a light layer of melted butter, then fold the oval in half lengthwise so that the butter-covered interior is covered. Next, reshape each piece back into a ball and place it in the buttered baking dish with the seam side down. Repeat this step until all the pieces have been buttered on the inside and four rows of dough balls are in the baking dish.

Brush the tops of the rolls with the remaining melted unsalted butter (if it has started to resolidify, just pop it on the stove for a few minutes on low until it has reliquified), then lightly cover the baking dish with plastic wrap and refrigerate for at least 30 minutes or up to 6 hours.

Bake the rolls in the oven until they have puffed up and taken on a golden color on the top, about 25-35 minutes. Brush the tops of the warm rolls with the 3 tablespoons of melted unsalted butter and sprinkle liberally with flaky sea salt. Rolls are best served warm.

TO STORE: Rolls can be kept at room temperature when wrapped tightly with aluminum foil for at least 3 days. When ready to serve, heat the oven to 350 degrees Fahrenheit, wrap the rolls in aluminum foil, and let them warm in the oven for 5-10 minutes.

(Tip: For best results, if you don’t have a scale, spoon the flour into your measuring cup and sweep off the excess with a knife to avoid over-packing.)

SOURCE: Adapted from Bon Appetit

Lightly Spiced + Everything Nice Christmas Cookies

This year, I am the Christmas Queen. SERIOUSLY. I am so incredibly proud of myself because I have NOT waited until the very last minute for my gifts. Usually, things get pretty down to the wire for me and I wind up finding myself staring at the impossibly long line at the post office praying that I can get things out on-time, then paying an arm and a leg to insure that possibility becomes a reality. But not this year, friends. This year, your girl started shopping a full TWO (2) months in advance. Granted, that first purchase was actually for myself (holiday cards), and I didm't buy anything else for a month, but it COUNTS. I will say this though: I've been behind on my holiday cookie making/ consumption. Only ONE batch of classically-Christmas cookies (oo alliteration) has made it out of the kitchen, and it's already December 21st! I'm ashamed. BUT, I plan to make up for this in the coming weeks. First up: these very lightly spiced (+ everything nice) Christmas cookies!

These are very, very simple cookies meant for when you want a taste, but you don't have a ton of time to fuss. The base is a classic sugar dough recipe, but with a hint of every single spice you have ever associated with Fall/winter.

These cookies are crispy, buttery and a bit little crunchy from the optional topping of Demerara sugar, which I recommend because not only does it add an extra layer of texture,  it also makes your cookies sparkle like they're supposed at Christmas time. And although these cookies do have spice, it's only a hint. I like it because it elevates your sugar cookie, and gives it a little more oomph. These cookies are for sugar cookie purists looking to fray a little from the pack. Go crazy, but not too crazy, know what I mean?

Try some!


LIGHTY SPICED + EVERYTHING NICE CHRISTMAS COOKIES

What You'll Need:

1/4 teaspoon ground cinnamon

1/4 teaspoon ground ginger

1/8 teaspoon ground cloves

1/8 teaspoon ground allspice

3/4 teaspoon kosher salt

1/2 teaspoon baking powder

3 cups all-purpose flour, plus more for rolling

2 1/2 sticks unsalted butter, chilled and cut into cubes

1 cup sugar

1 large egg

1 large egg yolk

1 teaspoon vanilla extract

Demerara sugar for topping, optional


DIRECTIONS 

Whisk the spices, salt, baking powder, and 3 cups flour in a small bowl. Set aside.

Using an electric mixer with the paddle attachment (or a hand mixer, or a wooden spoon), beat the butter and sugar on high speed until well-combined. Next, add the egg, egg yolk, and vanilla extract, and beat until combined. Scrape the sides and the bottom of the bowl if necessary.

Reduce the speed to low, then add about half of the dry ingredients until just combined. Then, add the rest and mix until combined; be careful not to over mix.

Form the dough into two 3/4 inch thick disks (you should see flecks of spices throughout the dough), wrap each disk in plastic wrap, then chill in the refrigerator for at least 2 hours, or overnight.

Place racks in the upper and lower thirds of the oven. Preheat the oven to 325 degrees F. Line two cookie sheets with parchment paper.

Let one disk of dough come to room temperature on the counter for 5-10 minutes so that is softens slightly. On a sheet of parchment paper that has been lightly floured, roll out the first disk of dough to 1/4 inch thickness, dusting with flour if it gets too sticky. Make sure to also flour your rolling pin, and cookie cutters. Cut out shapes with your cookie cutters, then transfer to the cookie sheets. Leave about 1 inch of space between each cookie.

Bake cookies about 12-16 minutes, rotating from front to back and top to bottom halfway through baking, until the edges are lightly golden brown. If using, immediately sprinkle Demerara sugar liberally on the tops of each cookie, then let them sit for five minutes on the baking sheet before transferring them to wire racks to cool completely. Repeat with the remaining cookie dough.

TO STORE: Cookies will last for at least a week if kept in an airtight container.


SOURCE: Adapted from Bon Appetit and Dorie's Cookies

Gluten Free Spiced Pumpkin Pie

K, we should probably start talking about Thanksgiving now, no? And what's better to talk about when we talk about Thanksgiving, than the true table staple? Pumpkin Pie. My favorite.

There's a debate every year in which the people in my family argue the importance of double P. Some people love it, some people hate it. Maybe it's the texture? I'm not really sure. All I know is there better be a silky Pumpkin Pie with hand-whipped cream on the table on the last Thursday of every November, or someone's in trouble. And if I have to be the one to make it, then so be it. At least I'll sleep well knowing that I already have my dessert plate mapped out for maximum consumption. But lately I've been thinking about my gluten-intolerant friends: what do they do when a flaky all-butter crust (my go-to for every pie), or a sweet and buttery graham cracker crust is not an option?

Last weekend we attended a Ladies' Day event in Milwaukee which my mother helped plan, and I volunteered to bake. Everything was going great, meal-plan wise until I was informed that there were gluten allergies and thus, the desserts must be completely gluten-free. I quickly assured her that it wouldn't be a problem, but I'll be honest: I was nervous. Despite the fact that I have a best friend who is gluten-intolerant, whenever food is involved, it's usually someone else making it and I don't have to worry about it. I made her flour-less chocolate cake once (it was DIVINE), but that was it.

Would I really have to buy new flours and ingredients that I probably would never use again? Or worse, use BOXED CAKE MIX?

I shudder to think. (Hi, I'm dramatic.)

Luckily, I was flipping through the pages of the November 2015 issue of Martha Stewart Living and came across the answer to all of my problems: Gluten-Free Pumpkin Pie! I was ecstatic of course. One, because you know how much I love pie and use any excuse to make it. And two, because I could use ingredients I have on hand absolutely all the time! I ran it by the committee, was told that I would have to make three, and was sent on my way.

I may have spent seven hours in the kitchen, but there's nothing I love more than making pie.

Now, what makes this pie GF you may ask? The CRUST! Three cups of Rice Chex (naturally and wonderfully GF), butter, brown sugar, and a little salt. Pulse those together in a food processor (I have a baby one that holds 4 cups), then spread into a pie plate, and bake it for 12 minutes to set. It's SUPER EASY, and CRAZY DELICIOUS. That brown sugar caramelizes in the oven, making the crust buttery and sweet with a hint of a crunch still. And pair that with the sweet pumpkin-y custard that is the filling, plus  the homemade whipped cream that was carefully piped onto the top, and it's just perfect.

I tell ya, it was a total hit amongst the gluten-lovers and gluten-intolerant alike, for we could all stuff our faces with pie in harmony.

Make it for Thanksgiving, make it forever.


GLUTEN-FREE SPICED PUMPKIN PIE 

What You'll Need:

Pie Crust:

  • 3 cups Rice Chex
  • 5 tablespoons unsalted butter, melted
  • 5 tablespoons packed light-brown sugar
  • 1/4 teaspoon coarse salt (I used coarse kosher salt)

Spiced Pumpkin Pie:

  • 1 1/2 cups unsweetened pumpkin puree
  • 3 large eggs, room temperature
  • 3/4 cup packed light-brown sugar
  • 1 tablespoon cornstarch
  • 1/2 teaspoon coarse salt (I used coarse kosher salt)
  • 1 teaspoon ground cinnamon
  • 1/4 teaspoon grated nutmeg
  • 1 cup whole milk

DIRECTIONS

First, let's make the pie crust:

Preheat the oven to 375 degrees

Pulse together the cereal in a food processor until finely ground. Then add the melted butter, brown sugar, and salt. Pulse until well combined.

Press the crust mixture evenly into the bottom and up the sides of a 9-inch pie pan. Bake until golden brown about 12 minutes. Set on a wire rack to cool completely.

OKAY, PIE TIME!

Reduce the oven temperature to 325 degrees F.

In a large bowl, whisk together the pumpkin puree and eggs.

In a smaller bowl, stir together the sugar, cornstarch, salt, cinnamon, and nutmeg. Transfer the dry ingredients into the bowl with the pumpkin-egg mixture, and mix until well combined. Then, whisk in the milk.

Place your cooled pie pan on a rimmed baking sheet to reduce the chance of your filling spilling out on the way to the oven. CAREFULLY pour filling into the center of the crust for more even spreading. DO NOT OVERFILL. You may have some filling leftover, and that's okay! You do not want an overflow in the oven, trust me.

Transfer your pie on the baking sheet to the oven and bake until filling is just set, ABOUT 50-55 minutes, but KEEP AN EYE ON IT. If a custard-based pie (like this one) is over-baked, it will crack, and no one wants that. (But if it does crack, you can always cover it with whipped cream, so don't fret.)

Set on a wire rack to cool completely.

Once cooled, pipe or spread on some homemade whipped cream if you're into it, and transfer pie to the fridge to chill before serving.

(MAKE AHEAD: This pie can be made up to 2 days ahead of time. KEEP REFRIGERATED.)

SOURCE: Slightly adapted from Martha Stewart Living

Last-Minute Halloween: Easy Lady Fingers

If you're trying to be kind of festive, but find yourself running out of time this Hallow's Eve, you should TOTALLY make some lady fingys. It's SUPER EASY: Just a basic sugar cookie recipe, a little food coloring, a paint brush, and some slivered almonds, and you're done!

The movie marathon is starting in a few hours (I may be the only one that watches, but so be it), and I refused to celebrate one of the best holidays without at least SOMETHING kind of creepy and festive. And I love cookies. So here we are.

What's super great about these (besides how simple they are to make) is that you really can't mess up. Halloween isn't about being perfect, in fact, the more imperfect the better! When you're rolling out your fingers, it's up to you how you want them to look. Do you want them to be bent and out of shape with brownish-yellow nails, or perfectly manicured with your favorite color like you've just brought them home from the salon? It's totally up to you. Go all out!

Since I made these for my family, I figured I should keep things kind of tame (I've seen examples of lady fingers where the ends have been dipped in raspberry jelly to look like they'd just been severed off the hand!), but next year? Next year we're upping the ante.

Until then, this is the perfect last-minute Halloween project for you and your friends, served however you'd like. Maybe all in a bowl? Or, you can be like me, and use it as a prop to point to things I want, but am too lazy to get myself. It's whatever you choose!

HAPPY HALLOWEEN, GUYS!! Be safe. Make sure all the kids that come to your door know how adorable they look, because they always do.


LADY FINGERS 

What You'll Need:

  • Food-safe paintbrush
  • 1-2 tablespoons red food coloring (or your favorite color, OR leave them plain)
  • 30 blanched almond slivers
  • 2 large eggs, at room temperature
  • 1/2 teaspoon vanilla extract
  • 1 stick unsalted butter, at room temperature
  • 1/2 cup confectioners' sugar
  • 5 tablespoons granulated sugar
  • Pinch of salt
  • 1 2/3 cups all-purpose flour

DIRECTIONS

Place food coloring in a small bowl, and, using a small food-safe paintbrush, color one side of each almond. Set aside on a sheet of wax paper to dry.

Separate one egg. Set the egg white in the fridge; we'll need it later. In a small bowl, whisk together the yolk, remaining egg, and vanilla extract until well combined. Set aside.

In the bowl of a stand mixer fitted with the paddle attachment (or using a hand mixer, or a wooden spoon), combine the butter, both sugars, and salt. Beat on medium speed until well combined. Next, add the egg mixture and mix until well combined and smooth, about 2-3 minutes. Add the flour, then mix on low speed until JUST combined.

Wrap the dough in plastic wrap, then chill in the fridge for 25-30 minutes to firm up.

While the dough is chilling, preheat the oven to 350 degrees F, and line two cookie sheets with parchment paper.

Once your dough has chilled, divide the dough in half, working with one half at a time. Keep the remaining half in the fridge wrapped in plastic wrap until you're ready to use it. Lightly flour your work station.

Using a knife or bench scraper, divide the first half into 15 pieces. Roll each piece back and forth with your palms into a finger shape (whether they be really thin fingers, or really short fingers, or really craggily fingers, it's up to you!), about 3-4 inches long. Pinch the dough in two places on one end to create knuckles. Lightly score each finger with the back of the knife to create the natural lines we have in our fingers. Push down on the nail bed LIGHTLY to make it easier to attach the fingernails later. Transfer fingers to the cookie sheets, and repeat the process with the other half of dough. (Note: Make sure to work kind of quickly when making the fingers because the dough warms up really fast, making it harder to work with!)

Once all of your fingers have been formed, brush the egg white from earlier lightly over each finger to create a light browning once they're in the oven. Position each almond nail, then push down to attach (Be careful not to push to0 hard so you don't a. chip a nail or b. misshape the finger). If you find that the nail isn't attaching, add a little more egg white to the area to create a sort of glue.

Bake in the oven until slightly browned, about 10-12 minutes. Let cool completely.

Enjoy!

SOURCE: Adapted from Martha Stewart 

Brown Butter Raspberry-Ricotta Breakfast Cake

Rasp ricotta cake 2Listen, there comes a time in every young woman's (or man's) life where s/he just has to throw every single thing down, and have cake for breakfast. Okay? You just have to have cake for breakfast sometimes. Cereal is my breakfast meal of choice. There are occasions where I or a loved one will have the energy to whip up pretty impressive omelets, but those times are pretty rare on the weekdays. And as much as I do actually genuinely enjoy a crunchy spoonful of cornflakes, sometimes all I want need first thing is a beyond-moist, tender, fruity-flavor-packed slice of cake. And I want to eat it with my hands. Forks are great, but we don't need 'em!

rasp ricotta cake 5

The selection of fruit at the grocery store is very hit-or-miss, which can be very frustrating as all anyone ever talks about in the food world is "embracing seasonality." It's hard to do that when you're looking at crates full of fuzzy raspberries. The great news is, not only is frozen fruit totally welcome in this cake, it's actually a requirement. Thank goodness for the Frozen Foods section.

rasp ricotta cake 4

rasp ricotta cake 3

So, what makes this cake so moist? FULL FAT RICOTTA CHEESE. Don't you dare get that skim nonsense! We're having cake for breakfast, so let's not torture ourselves by trying to make it healthy, alright? And anyway, you want the cake to be as thick and rich as possible, so whole milk ricotta it is!

And let''s just talk about the brown butter for a second. Ohmygosh I love brown butter. It adds a certain depth to any and everything, and I don't even know what I did with my life before I knew how to do it.

rasp ricotta cake 1

It's just been a really good breakfast (and also dessert) week in this house.

And P.S. This is a GREAT choice for your 4th of July Weekend red-white-and-blue-food-eating festivities!! Fourth of July Breakfast Cake is a thing, right?


BROWN BUTTER RASPBERRY-RICOTTA CAKE 

What You'll Need:

  • Nonstick cooking oil spray
  • 1 stick plus 3 tablespoons unsalted butter
  • 1 1/2 cups all-purpose flour
  • 1 cup sugar
  • 2 teaspoon baking powder
  • 3/4 teaspoon kosher salt
  • 3 large eggs, room temperature
  • 1 1/2 cups ricotta cheese, preferably whole milk
  • 1/2 teaspoon vanilla extract
  • 1 cup frozen raspberries, divided
  • 1 teaspoon lemon juice
  • 1 teaspoon of sugar

DIRECTIONS:

Preheat the oven to 350 degrees F.

Line a 9-inch round cake pan with parchment paper, and lightly spray with nonstick cooking oil spray.

To brown the butter:

In a medium saucepan, melt your butter over medium-low heat. After a few minutes, your melted butter will start to crackle and bubble vigorously; those are the milk solids and water evaporating. After 2-3 minutes of the butter crackling, you should start to smell a nutty aroma coming from the pan, and your butter will start to darken in color. DO NOT leave while the butter is browning as it can go from brown to burnt fairly quickly.  The bubbling and crackling will eventually subside, and your darkened butter should have little brown bits floating around on the bottom. Take the butter off the heat, and let it cool slightly.

Let's make the cake:

In a large bowl, whisk the flour, sugar, baking powder, and kosher salt. Set aside.

In a medium bowl, whisk the eggs, ricotta, and vanilla extract until combined, then fold them into the dry ingredients until they are just combined.

Fold in the melted butter, then VERY GENTLY fold in 3/4 cup of the raspberries, being very careful not to crush any berries.

In a small bowl, gently toss the remaining 1/4 cup of raspberries with the lemon juice and sugar. If the raspberries seem a little too tart, you can sprinkle in a little more sugar to fit your tastes. 

Scrape your cake batter into your prepared pan and scatter the raspberries that you have just tossed with lemon and sugar, over the top. (Get creative with your design!)

Bake your cake until it is golden brown and a toothpick that has been inserted into the center, comes out clean; about 50-60 minutes. (Depending on your oven, your cake may need a little less time, so keep an eye on it when the time gets closer to 50 minutes.)

Let your cake cool for at least 20-30 minutes in the pan, on a wire rack, before unmolding and serving.

To Store:

Wrap the cake TIGHTLY in cling wrap and store at room temperature.


SOURCE: Adapted froBon Appetit 

French Silk Pie

photo-10 Happy Valentine's Day! I love love, and I love chocolate, so let's dive right in.

Ever since my visit to Chicago's Bang Bang Pie, I have been obsessed with french silk pie. I've been told it's a classic diner pie , but this girl has been to her fair share of diners, and no french silk in sight! It's just as well; the first time you have french silk pie has to be a straight up experience, not just another dessert.

People are always likening the things they really, really like to Heaven. You know what I mean? "That massage I just got? HEAVEN." "That shoe place is like HEAVEN." "Those dogs kisses on my mouth? HEAVENNN." It's become so overused. But let me tell you something right now: the only thing better than this pie once it's completely chilled and set, is the actual moment of euphoria that is finding extra filling in the mixing bowl once the pie shell has been filled. That unset, chocolate mousse filling is actual Heaven on Earth. It's silky (hence the name!), chocolaty beyond belief, creamy, and lighter than air. It's silky, chocolaty, creamy air on a spoon. I will not tell you how much of it I ate before I could finally snap myself out of it to transfer the pie to the fridge before there was nothing left but crumbs in a disposable tin. If it wasn't already destined to be dessert at a Valentine's Day party, this french silk pie, along with its identical twin pie brother, would've been gone SO FAST with no regrets.

Alas, they were promised for many other tummies besides mine, so I had to let them go.

There better be leftovers.


What You'll Need:

For the Crust: 60 Vanilla wafers, finely crushed 1/4 teaspoon cinnamon 3/4 cup (1 1/2 sticks) unsalted butter, melted and cooled For the Filling: 3/4 cup superfine sugar 2 large eggs, lightly beaten 2 1/2 ounces bittersweet chocolate, melted 1/2 cup (1 stick) unsalted butter, softened 1 1/4 cup heavy whipping cream 2 teaspoons vanilla extract

Preheat the oven to 350 degrees F

To make the crust: Place your freshly crushed vanilla wafers, cinnamon, and melted butter into a medium sized mixing bowl, and stir together until all ingredients are completely combined.

Pour your mixture into a 9 inch pie plate and press the bottom and sides to create an even layer. You may end up with a little extra once you're finished.

Bake your crust for 10-15 minutes until it's golden brown. Once removed from the oven, set it on a cooling rack to cool completely, then place in the refrigerator until you need it.

To make the filling: Place eggs and sugar in a medium saucepan, continuously whisking together on medium-low heat. You'll know that your mixture is ready when it is thick enough to coat the back of a spoon. This should take 5-7 minutes. While your mixture is cooking, melt the chocolate.

Stir your melted chocolate into the mixture, and continue to stir until it's smooth. Remove from heat, and let it completely cool.

In a stand mixer fitted with the paddle attachment (or in a bowl with a hand mixer, or with a wooden spoon), beat your butter until it is light and fluffy. Add your cooled chocolate mixture, and continue to mix until everything is fully combined. Make sure to scrape down the sides of the bowl occasionally.

In a separate bowl, beat together your heavy cream and vanilla extract until stiff peaks form. Fold your newly whipped cream into your chocolate mixture and mix until it's light and fluffy. (I've found that it's sometimes necessary to help the process by mixing it with a rubber spatula for a few seconds to make sure all of the chocolate is incorporated.)

Remove your chilled crust from the refrigerator, and fill with chocolate filling. (You may end up with some extra filling at the end. I find it best to eat with a spoon). Refrigerate for 4-6 hours (or overnight). Once ready to serve, top with some homemade whipped cream, and enjoy!

SOURCE: Spoon Fork Bacon


Forks up! Everybody have some pie.

Merry Christmas! Have a Cookie.

photo 2 Merry Christmas! May your holiday season be full of whimsy, and your holiday baking successful.

This was my first time using royal icing and a piping bag, and I'm happy to say that things went off without a hitch! Can't wait to snack on cookies all day and night long.

Two things:

  • Here's how to make the best royal icing ever...
  • ...And the ULTIMATE sugar cookies to go with it!


I'm staying in my Christmas jammies all day, and don't try to stop me.


singature gray

Mexican Wedding Cookies

DSCN0669 Holiday baking is officially in full swing and there is no one in this world happier about that than I am. There are holiday parties all over the place in the near future, and it means loads of planning, which puts me front-row-center in my happy place. To make things even sweeter, we have a beautiful, fragrant Christmas tree just waiting to be decorated, and of course, the proper way to decorate any tree is with a mouthful of cookies and ornaments in both hands.

DSCN0675

It's always best to ease into the baking season with a simple cookie that's tasty and seemingly complex enough, but takes you very little time in the kitchen to make. After all, you've got a lot of baking ahead of you, and don't want to burn yourself out with the very first batch! That's where these Mexican Wedding Cookies come in. They're simple little things, but they're packed with buttery flavor,  nutty crunch, and so much sugar. They're perfect for any time of year really, but just seem to make everything just a little brighter around Christmastime.

DSCN0676

I used almonds in my cookies, though you can get away with any nut you love, so long as you chop it up finely. No one wants to bite into a cookie with just a little too much crunch. Though if you ask my father, he'd strongly disagree. He's been pushing for weeks for a dessert with nuts, and so far, these haven't disappointed him!

DSCN0674

There is actually no such thing as too much powdered sugar with these cookies, and that is absolutely a fact. It reminds me of the gentle kiss of snow and how much a beautiful winter day can put me in a wonderful mood...you know, if I don't have to drive in it. But looking out the window with a warm cup of cocoa, impossibly cozy socks, and a stack of new cookbooks with spines that crack upon first opening, is my kind of winter's day. Put a plate of these Mexican Wedding Cookies in front of me, and we're talkin' business.


Here's What You'll Need:

  • 1 cup butter, softened
  • ½ cup powdered sugar
  • 1 teaspoon vanilla
  • 2 ¼ cups flour
  • ¼ teaspoon salt
  • ¾ cup finely chopped nuts (pecans, walnuts, or almonds)
  • Powdered sugar for rolling

Find the recipe here at Crazy for Crust!


LET THE CHRISTMAS COOKIE SEASON BEGIN.

singature gray

Fall Mornings

photo-8  

Don't you just love Fall? Sure, everything's dying, the chilly wind might be a little much to take first thing in the morning, and you're just creeping closer and closer to snow everywhere, all the time. But I don't mind. I adore sweater weather and sometimes find myself counting down the days in the summer when the heat and humidity (and constant re-applying of sunscreen) makes me a little cranky, and also very, very burned. I've never been one for warm weather. Give me a cool, sunny 70 degrees and we're good. Give me a balmy 90, and we can't talk because I'll be inside hugging an air conditioner like a long lost friend.

Fall means the start of lots of things. When I was a student, it meant going back to school and seeing how people had changed in just three months. It meant going on a Back-to-School shopping spree at Target and pretending you were a contestant on one of those grocery store game shows from the 90s (Fill up the cart! Fill up the cart!). Now, it means the beginning of Holiday Season, and all that comes with it. I'll admit that it is often disconcerting to see Santa Claus in late August, but it's wonderful to see him still greeting me in December. Sure, it might be a little too soon to start playing a holiday record here or there, but one will never get tired of hearing Ella Fitzgerald sing "Sleigh Ride" no matter what time of year it is.

For me, Fall means the door has been opened to the holidays I live for. I don't mind the extra jacket because it means I'm well on the way to spending time with relatives far away, and eating my weight in cookies, cakes, pies, etc. You will never eat enough pumpkin-apple-cinnamon-spice ANYTHING, and that, my friends, is an actual Fall fact of life.

So, bring on the chilly weather! I'll just put on thicker socks.


P.S. HAPPY HALLOWEEN WEEK!

singature gray